
In today’s post, we are creating a random city street generator. I was working on an idea for a game that requires a randomized city. I wanted to start development of the game by creating the city street generator. In a future post, we will cover adding the buildings.
This project turned out to be much more complex than I expected. Fittingly, I came across the following meme on Reddit, which perfectly encapsulated by thoughts about this project.
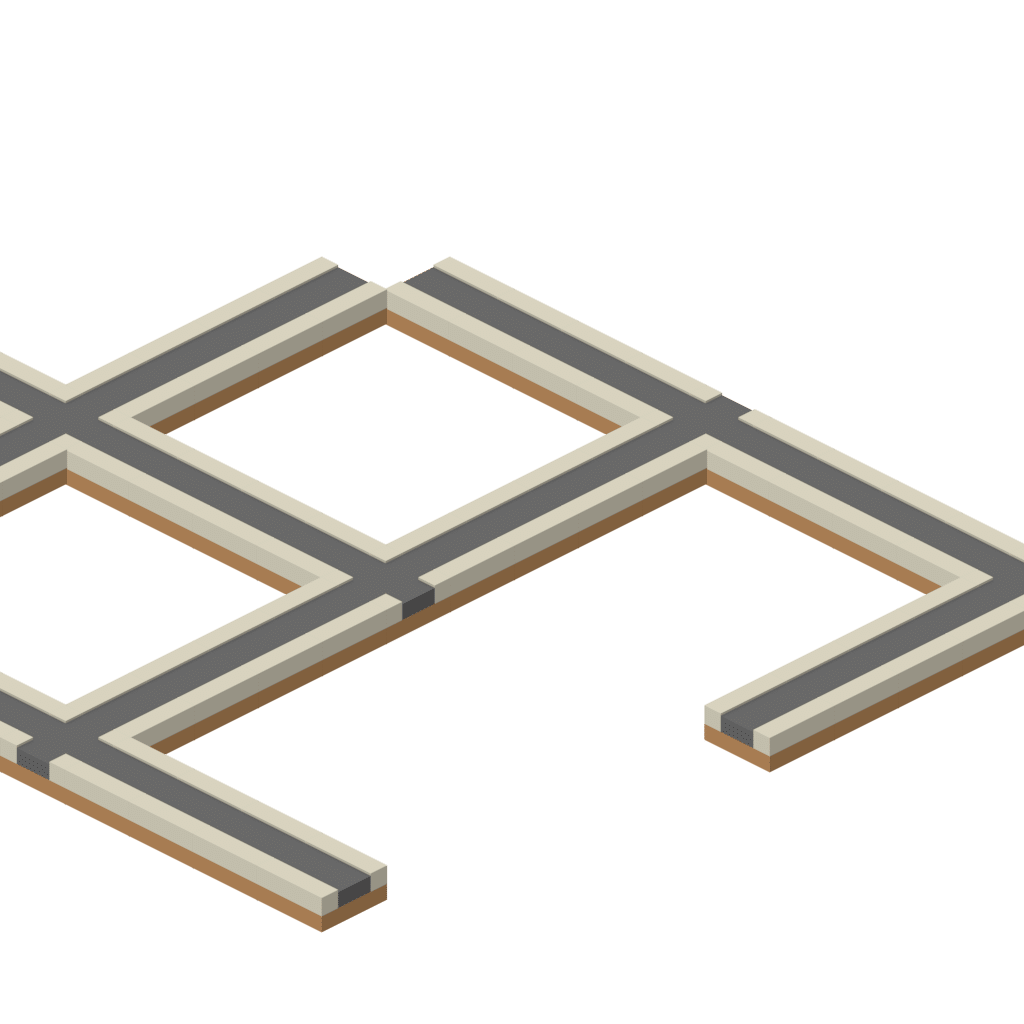
Below are some sample images that I generated using the code:

The Approach
When I started this project, I planned to simply create a tile matrix and walk through the matrix generating a random tile for each space in the map. However, as soon as I started creating the code, I realized it was much more complicated. Roads are connected together. You don’t want a road tile randomly interspersed with buildings. In addition, the roads have to make sense.
I tried creating a set of rules for the generation of a tile. For example, when you are placing a tile, you look at the 8 surrounding tiles to decide. This was a complicated ruleset and resulted in too many roads.
It was at this point that I turned to the Internet to see how others had done it. I came across an interesting idea, use a recursive function and think of the road like a tree. This significantly simplified how I was thinking about the roads.
The Basic Algorithm
Before we get to the algorithm, let’s talk about the map key. For this simple map, we are going to place 4 different types of tiles:
- (“b”) blank
- (“#”) Intersection
- (“-”) straight road in x direction
- (“|”) straight road in y direction
We are going to create an m x n matrix where m is the width, and n is the height of the tilemap. We will place a single character in each location of the tilemap to denote the type of tile in that location. For example, we will place the # for an intersection (in retrospect, I should have used the + for an intersection).
Here are the basic steps to the algorithm:
- Place an intersection somewhere on the map.
- For each direction from the intersection create a road.
- At the end of the road use weighted probability to do one of the following:
- Continue the road
- Place a new intersection
- End the road (blank tile)
The algorithm continues until all roads either end in a blank tile or reach the edge of the map.
Generate City
The first method that we will look at is generateCity. This method uses Numpy to create a tilemap of the specified size.
Next, we create a starting position. We use integer division to find a spot around ⅓ of the size of the map. This gives us room to build. I initially started in the middle of the map, but I found that it consistently created in the lower half of the screen.
We place an intersection at the starting position. Then we call the method newRoad in each of the directions.
def generateCity(self,width,height):
    """Create a map of size width x height."""
    self.width = width
    self.height = height

    self.cityMap = ndarray((width,height),dtype='O')

    # Place a starting intersection in the upper third of the map
    currX = self.width // 3
    currY = self.height // 3
    self.cityMap[currY][currX] = '#'

    # Generate roads in all directions
    self.newRoad((currX,currY),'u')
    self.newRoad((currX,currY),'d')
    self.newRoad((currX,currY),'l')
    self.newRoad((currX,currY),'r')
New Road
The next method creates a new section of road. The input parameters provide the starting coordinates and the direction to draw the road.
The method creates a variable called vector that holds a tuple with the direction. This just simplifies the method so we can use the same code for all directions.
Next, we create the road sections. I initially set this as a random number of road segments. However, the result was too unpredictable. Therefore, I changed it to 5. This created much better looking roads.
Finally, at the end, if the next tile is empty, we call newIntersection, which will determine whether to place an intersection or not.
def newRoad(self,currentPosition, direction):
    """Creates a new road in direction. Direction can be 'u','d','l','r'."""
    if direction == 'u':
        vector = (0,-1)
        directionChar = '|'
    elif direction == 'd':
        vector = (0,1)
        directionChar = '|'
    elif direction == 'l':
        vector = (-1,0)
        directionChar = '-'
    else:
        vector = (1,0)
        directionChar = '-'

    # Originally, this was intended as a random road length. However, this created
    # unpredictable results. Therefore, we changed to a constant.
    randRoad = 5
    for index in range(1,randRoad):
        currX = index*vector[0] + currentPosition[0]
        currY = index*vector[1] + currentPosition[1]

        # If we are outside the width of the map, simply return
        if currX >= self.width or currX <0 or currY >= self.height or currY <0:
            return

        if self.cityMap[currY][currX] == None:
            self.cityMap[currY][currX] = directionChar

    # Move to the next spot
    currX = currentPosition[0]+vector[0]*(randRoad)
    currY = currentPosition[1]+vector[1]*(randRoad)
    if currX >= self.width or currX <0 or currY >= self.height or currY <0:
            return

    # Call newIntersection to determine whether we should create a new intersection or not.
    if self.cityMap[currY][currX] == None:
        self.newIntersection((currX,currY),direction)
New Intersection
The newIntersection method decides whether to place a new intersection, continue the road, or end the road.
We create a random integer between 0 and 10 (inclusive of both 0 and 10). Then we have an if statement to decide what to do:
- If the random integer is less than 3 (~27% chance), we create a new intersection. We then call the new road method for all directions, except for the direction from which we came.
- If the random integer is greater than 6 (~34% chance), we continue the road.
- Finally, if the random integer is between 3 and 6 (~34% chance), we end the road.
def newIntersection(self,currentPosition,direction):
        """This function decides whether to create a new intersection, straight road, or stop."""

        prob = random.randint(0,10)

        currX = currentPosition[0]
        currY = currentPosition[1]

        # 30% probability of a new intersection, 40% probabiloity of a straight road, 30% probability that the road just ends
        if prob < 3:
            # New intersection
            self.cityMap[currY][currX] = '#'

            # start a road in every direction except where we came from
            if (direction != 'u'):
                self.newRoad((currX,currY),'u')
            if (direction != 'd'):
                self.newRoad((currX,currY),'d')
            if (direction != 'l'):
                self.newRoad((currX,currY),'l')
            if (direction != 'r'):
                self.newRoad((currX,currY),'r')
        elif prob > 6:
            # Keep going
            if direction == 'u' or direction == 'd':
                self.cityMap[currentPosition[1]][currentPosition[0]] = '|'
            else:
                self.cityMap[currentPosition[1]][currentPosition[0]] = '-'

            self.newRoad((currX,currY),direction)
        else:
            # else - blank - stop
            self.cityMap[currentPosition[1]][currentPosition[0]] = 'b'
Drawing the Map
Now that we have a matrix with the map, the next step is to draw the map. For this, we will use the Pillow module and isometric city images from Kenney. Our general approach is:
- Load the files
- Create the new image
- Generate the city (using the code we talked about above)
- Walk through the map and copy the individual pieces into the final image.
Some Quick Math
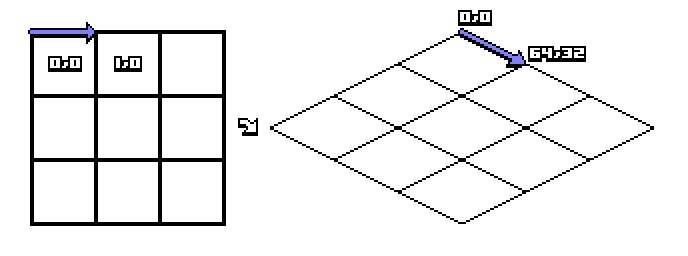
The tiles we are using are isometric. This created a few complexities. First, since the tiles are rotated 45 degrees, we needed to think about our map as rotated. Therefore, we used the convention that the x direction, means the diagonal across the screen from (0,0) to (screen width, screen height) and down is the diagonal from (screen width, 0) to (0, screen height).
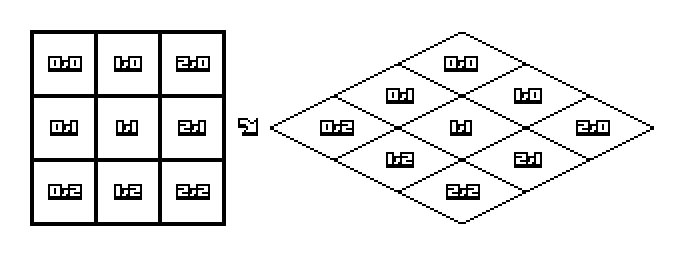
This image is from the Isometric Tiles Math post by Clint Belanger (CC BY-SA). I found this post to be incredibly helpful when developing this algorithm.
The other math to consider is that our tiles overlap. This results in a fairly complicated line.
position = ((x*tile_width_half)-(y*tile_width_half)+startPosition[0],(y*tile_height_half)+(x*tile_height_half)+startPosition[1])If we wanted to make the code more clear, we could convert to:
xPos = (x*tile_width_half)-(y*tile_width_half)+startPosition[0]
yPos = (y*tile_height_half)+(x*tile_height_half)+startPosition[1]
position = (xPos,yPos)
As you can see, the x position depends on both the current x and y in the tilemap. If you think about our map as rotated around the z axis, a movement along x in our tilemap actually moves us in both the x and y on the screen image.
Placing the Tile
Once we know where the tile goes, we just need to draw it. We use the alpha_composite that allows us to remove the transparent part of the image.
if currentMap[y][x] == '#':
    city.alpha_composite(self.intersection,position)
elif currentMap[y][x] == '|':
    city.alpha_composite(self.up,position)
elif currentMap[y][x] == '-':
    city.alpha_composite(self.left,position)
Conclusion
The next step will be to start placing buildings. I also may experiment with additions to the road. For example, in some games, I may need a road that extends to the edge of the map with intersections along the length. I also want to identify places to add an intersection when two pieces of road are next to each other.
Was this useful, or do you have another game development tool that you need? Leave a comment or like this post.


One Comment