Playing with the Blender source code, we want to make a custom compositor node. This included significantly more files than I expected, and there is not a lot of documentation on how to do this. Therefore, this post will walk through the different files to add or modify.
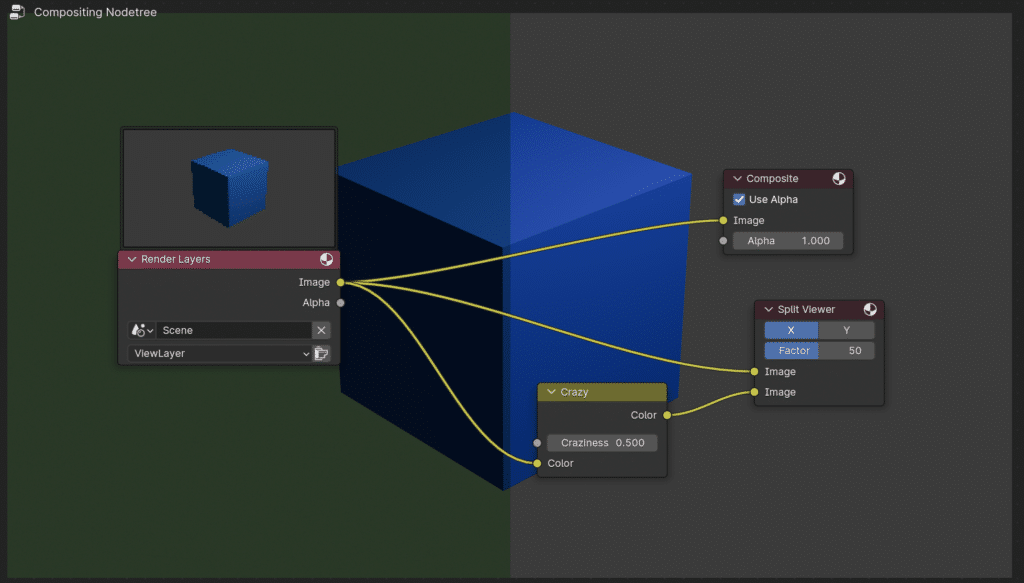
This particular compositor node doesn’t do anything useful. It switches and modifies colors. However, the purpose of this was mostly to get a working compositor node. In the future, we want to build something more useful.
Building Blender
The first step is building Blender. In order to make a change, we need to make sure that the main branch can run. I am not going to cover building in detail here. The Blender resources for building are really helpful.
Create a Branch
Once you are able to build the main branch, the next step is to create our own branch. This allows us to make changes, but not affect the main branch. This is a really important tool. We can easily switch between branches and back to main. For more information on branches, check out this tutorial.
To create a new branch, type:
git branch tmp-SimpleCMPNode
git checkout tmp-SimpleCMPNode
Alternatively, you can create and checkout a new branch with:
git checkout -b tmp-SimpleCMPNodeYou can always see what branch you are on by typing:
git branchThis lists all of the local branches and highlights the current branch.
To switch back to main, you just need to type:
git checkout mainWhat Files Will We Add or Change
We will go through each of these in more detail below, but here is a quick overview of the files to create a custom compositor node, and here is the diff.
| File | New or Changed File | Description |
|---|---|---|
| scripts/startup/bl_ui/node_add_menu_compositor.py | Change | Add our node to the menu |
| source/blender/blenkernel/BKE_node.h | Change | Add a define for our node |
| source/blender/compositor/intern/COM_Converter.cc | Change | Convert from define into the node code |
| source/blender/compositor/nodes/COM_CrazyNode.hCOM_CrazyNode.cc | New | Map the registered node inputs into the operation inputs |
| source/blender/compositor/operations/COM_CrazyOperation.hCOM_CrazyOperation.cc | New | Operation of the Node: What the node does |
| source/blender/nodes/composite/node_composite_register.ccnode_composite_register.hh | Change | Register our node |
| source/blender/nodes/composite/nodes/node_composite_crazy.cc | New | Creates the node registration function |
| source/blender/nodes/NOD_static_types | Change | Adds our node to RNA. |
Creating a Basic Node
We will start by creating the custom compositor node itself. We need to add a new file that we will call node_composite_crazy.cc
This file will be located in source/blender/nodes/composite/nodes/.
The first function in this file creates the inputs and outputs for the node. In our case, we want a float input and a color input. We create a default value for both properties.
static void cmp_node_crazy_declare(NodeDeclarationBuilder &b)
{
  b.add_input<decl::Float>("Craziness").default_value(0.5);
  b.add_input<decl::Color>("Color")
      .default_value({1.0f, 1.0f, 1.0f, 1.0f})
      .compositor_domain_priority(0);
  b.add_output<decl::Color>("Color");
}
If we wanted to add any additional properties, we can use the next function. We could have made the craziness float input as a property, but I preferred to have a node input.
static void node_composit_buts_crazy(uiLayout *layout,
                                     bContext * /*C*/, PointerRNA *ptr) {}
Next, we create a new class called CrazyOperation that is a subclass of NodeOperation. This class has one method, execute, that doesn’t do anything. However, this is where you would put your code to handle anything that needs to be done when the node is created.
class CrazyOperation : public NodeOperation {
 public:
  using NodeOperation::NodeOperation;

  void execute() override {}
};
An alternative to creating a child of NodeOperation is to create a child of ShaderOperation. You would use this if you needed to use the GPU material compiler.
The next function, get_compositor_operation, returns an instance of our class CrazyOperation.
static NodeOperation *get_compositor_operation(Context &context, DNode node)
{
  return new CrazyOperation(context, node);
}
Finally, we create a node registration function, register_node_type_cmp_crazy(). This code calls cmp_node_type_base with a define (that we haven’t defined yet), a name, and a type. In our case, since our node affects the color, I chose NODE_CLASS_OP_COLOR.
cmp_node_type_base initializes a bNodeType variable (a struct that contains information about a node). We assign our functions created above to variables in the bNodeType structure.
void register_node_type_cmp_crazy()
{
  namespace file_ns = blender::nodes::node_composite_crazy_cc;

  static bNodeType ntype;

  cmp_node_type_base(&ntype, CMP_NODE_CRAZY, "Crazy", NODE_CLASS_OP_COLOR);
  ntype.declare = file_ns::cmp_node_crazy_declare;
  ntype.draw_buttons = file_ns::node_composit_buts_crazy;
  ntype.initfunc = file_ns::node_composit_init_crazy;
  ntype.get_compositor_operation = file_ns::get_compositor_operation;

  nodeRegisterType(&ntype);
}
The final line calls nodeRegisterType to register the node.
Register the Node
Now that we have have the node registration function from the previous section, we need to register it. We will place the declaration of the function in source/blender/nodes/composite/node_composite_register.hh. We will call the function in source/blender/nodes/composite/node_composite_register.cc.
Creating a Define for the Node
We are going to create a #define for CMP_NODE_CRAZY in source/blender/blenkernel/BKE_node.h. We assign a number that is unused.
#define CMP_NODE_LENSDIST 303
#define CMP_NODE_SUNBEAMS 304
#define CMP_NODE_CRAZY 305
We map this define to the node that we created in the file source/blender/compositor/intern/COM_Converter.cc. Specifically, we add a switch case for our define.
    case CMP_NODE_KUWAHARA:
      node = new KuwaharaNode(b_node);
      break;
    case CMP_NODE_CRAZY:
      node = new CrazyNode(b_node);
      break;
  }
We add a line to source/blender/nodes/NOD_static_types.h that will add our node to RNA.
DefNode(CompositorNode, CMP_NODE_COMBINE_COLOR,  def_cmp_combsep_color,  "COMBINE_COLOR",  CombineColor,     "Combine Color",     ""              )
DefNode(CompositorNode, CMP_NODE_KUWAHARA,       def_cmp_kuwahara,       "KUWAHARA",       Kuwahara,         "Kuwahara",          ""              )
DefNode(CompositorNode, CMP_NODE_CRAZY,          0,                      "CRAZY",          Crazy,            "Crazy",             ""              )
CrazyOperation
Next, we will create the code that executes when the compositor is running. We will add the files COM_CrazyOperation.h and COM_CrazyOperation.cc in source/blender/compositor/operations.
We define a new class called CrazyOperation that is a subclass of MultiThreadedOperation. The class has two private members that represent the inputs. The class creates functions to initialize, deinitialize, and execute.
class CrazyOperation : public MultiThreadedOperation {
 private:
  /**
   * Cached reference to the input_program
   */
  SocketReader *craziness_reader_ = nullptr;
  SocketReader *color_reader_ = nullptr;

 public:
  CrazyOperation();

  /**
   * The inner loop of this operation.
   */
  void execute_pixel_sampled(float output[4], float x, float y, PixelSampler sampler) override;

  /**
   * Initialize the execution
   */
  void init_execution() override;

  /**
   * Deinitialize the execution
   */
  void deinit_execution() override;

  void update_memory_buffer_partial(MemoryBuffer *output,
                                    const rcti &area,
                                    Span<MemoryBuffer *> inputs) override;
};
The constructor creates the input and output sockets for the operation. In a separate step, we will connect these to the same sockets on the node. We also call set_canvas_input_index with a value of 1, which means the color input socket is the canvas of the operation.
CrazyOperation::CrazyOperation()
{
  this->add_input_socket(DataType::Value);  // Craziness.
  this->add_input_socket(DataType::Color);

  this->add_output_socket(DataType::Color);

  /*Set the input canvas to socket(1), which is the color input.*/
  set_canvas_input_index(1);
}
The initializer function, init_execution, is called when the node begins to run. We store a pointer to the socket inputs in the private members. The de-initializer simply sets the private members back to a null value.
void CrazyOperation::init_execution()
{
  craziness_reader_ = this->get_input_socket_reader(0);
  color_reader_ = this->get_input_socket_reader(1);
}

void CrazyOperation::execute_pixel_sampled(float output[4], float x, float y, PixelSampler sampler)
{
  float input_value[4];
  float input_color[4];
  craziness_reader_->read_sampled(input_value, x, y, sampler);
  color_reader_->read_sampled(input_color, x, y, sampler);

  const float value = input_value[0];

  output[0] = input_color[1] * value;
  output[1] = input_color[0];
  output[2] = input_color[2] * value;
  output[3] = input_color[3];
}

void CrazyOperation::deinit_execution()
{
  craziness_reader_ = nullptr;
  color_reader_ = nullptr;
}
The method, execute_pixel_sampled, is the heart of the node. This executes for each pixel. We read the value for the pixel from the sockets. We then switch the red and blue inputs. We multiply red and blue by our craziness factor.
void CrazyOperation::execute_pixel_sampled(float output[4], float x, float y, PixelSampler sampler)
{
  float input_value[4];
  float input_color[4];
  craziness_reader_->read_sampled(input_value, x, y, sampler);
  color_reader_->read_sampled(input_color, x, y, sampler);

  const float value = input_value[0];

  output[0] = input_color[1] * value;
  output[1] = input_color[0];
  output[2] = input_color[2] * value;
  output[3] = input_color[3];
}
Convert to Operations
Next, we map our node sockets to the operation sockets. We create two new files, COM_CrazyNode.h and COM_CrazyNode.cc, in source/blender/compositor/nodes/.
class CrazyNode : public Node {
 public:
  CrazyNode(bNode *editor_node) : Node(editor_node) {}
  void convert_to_operations(NodeConverter &converter,
                             const CompositorContext &context) const override;
};
The main method is convert_to_operations. This method simply connects the input sockets to the operation sockets.
void CrazyNode::convert_to_operations(NodeConverter &converter,
                                      const CompositorContext &context) const
{
  CrazyOperation *operation = new CrazyOperation();

  /*Map the input socket to operation socket.*/
  converter.add_operation(operation);
  converter.map_input_socket(get_input_socket(0), operation->get_input_socket(0));
  converter.map_input_socket(get_input_socket(1), operation->get_input_socket(1));
  converter.map_output_socket(get_output_socket(0), operation->get_output_socket());
}
Adding to the UI
The final step for our custom compositor node is to add the node to the UI. This was the most frustrating and surprising part of the process. I was surprised that the UI is defined by Python. We just need to add one line that adds our compositor node to the compositor menu.
        node_add_menu.add_node_type(layout, "CompositorNodeRGBToBW")
        node_add_menu.add_node_type(layout,"CompositorNodeCrazy")
Cmake Lists
Blender uses Cmake to generate the make files. We need to add our new files to the relevant Cmake lists. You know you missed something in the CMake lists if the make fails to link.
| CMake File | What to Add |
|---|---|
| source/blender/compositor/CMakeLists.txt | nodes/COM_CrazyNode.ccnodes/COM_CrazyNode.hoperations/COM_CrazyOperation.ccoperations/COM_CrazyOperation.h |
| source/blender/nodes/composite/CMakeLists.txt | nodes/node_composite_crazy.cc |
Conclusion
Hopefully, this is helpful. I found it very difficult to find all of the files in the Blender source that I needed to change to add a custom compositor node. In addition, I spent a lot of time analyzing the different compositor nodes to try to understand how each part of the node worked. Please let me know in the comments below if you have any questions. Our next step is to make a more useful node.