In our last post, we dove into drivers, focusing on what they are and how to set them up. Today, we are going one (or two) steps further. We will be setting up drivers in Blender through the Blender Python API.
- The Data Block Hierarchy
- Access Driver Information
- Editing the Driver Expression
- Driver Variables
- Custom Properties
- Custom Function
As a quick refresher, drivers allow you to animate almost any property in Blender using a simple Python expression. They are different from keyframes where you have to set the values for each keyframe (although if you are looking for how to set keyframes through code, check out our post).
One of the best uses of drivers in Blender is to create cyclical motion such as a moon revolving around a planet or an object that bounces up and down with a set frequency.
Drivers in Blender API: The Data Block Hierarchy
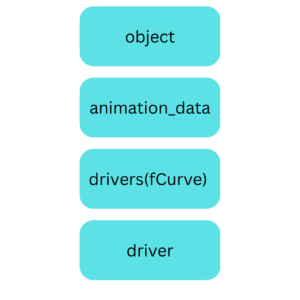
Before we dive into the code, it is useful to understand where drivers fit in the Blender Python API. Driver data is stored in an object, specifically, within the animation_data of an object.
For example, if I have a cube with a driver. I can select the cube and look at the drivers by:
bpy.context.object.animation_data.driversAccessing Information about Drivers in Blender
With the following code, you can iterate through the current drivers.
for fcurve in bpy.context.object.animation_data.drivers:
    print(fcurve.data_path, fcurve.array_index, fcurve.driver.type, fcurve.driver.expression)
In this example, we loop through animation_data.drivers, which is a collection of fcurves. With the fcurve, we can access that data path that the fcurve is connected to. Each fcurve has an associated driver that gives us access to the expression.
Editing the Expression
The expression is a simple Python expression. I emphasized simple for a reason. The driver system is optimized to run simple Python expressions without using the full interpreter. This is intended to make the expressions fast. You can take a look at the available expressions here.
Later in this post, we will talk about how to use more complex Python, but for now, let’s stay simple.
With a new default scene, go into the Python scripting tab. We will use the Python Console (the REPL).
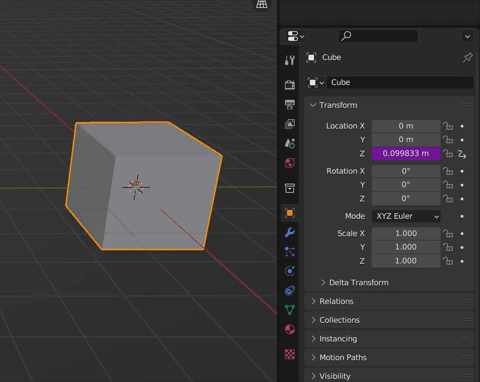
Select the cube and type:
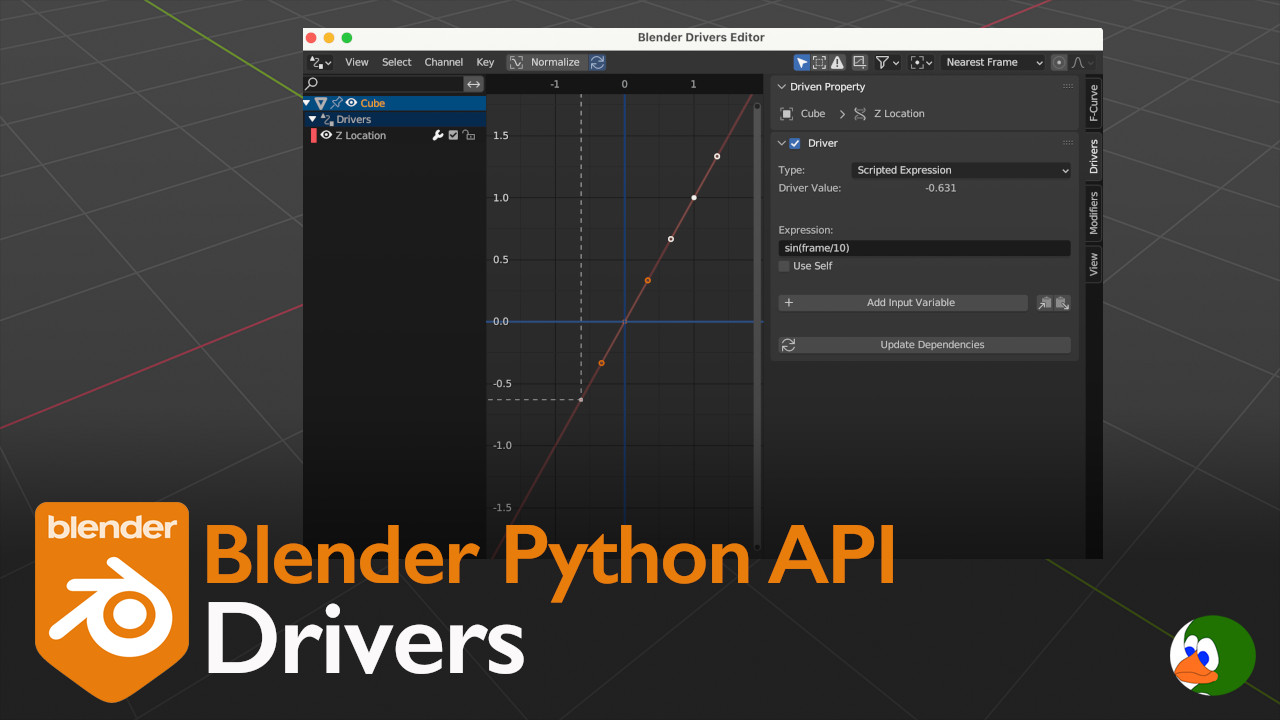
myDriver = bpy.context.object.driver_add('location',2)
myDriver.driver.expression = 'sin(frame/10)'
The first line creates the driver through the function driver_add, which takes two arguments. The first is the data path (in our case we are using location). The second argument is optional and is the index of the data path. Location uses the index to specify x , y, or z with corresponding indices x=0, y=1, z=2. This function returns an f-curve.
The f-curve has a property called driver. In the second line above, we will use the driver property to assign the expression sin(frame/10). In this case, we are using the sine function. Sine is a great function for cyclical movement since it bounces between -1 and 1 infinitely. As input to the sine function, we use the global variable frame to get the current frame number. We divide the frame number by 10 just to slow down the bounce.
We run the script and now, we see that the z location property of the cube is purple. If we run the animation, the cube bounces.
Variables
If, instead of using the global variable frame, we wanted to use the data path to the current frame, we could insert that into the expression:
sin(bpy.data.scenes["Scene"].frame_current/10)However, you will see a bunch of warnings:

Just by replacing the global variable frame with the current frame data path, we went beyond a simple expression. If we type:
myDriver.driver.is_simple_expressionWe see the return is False. As noted in the screenshot above, Blender recommends using variables instead of bpy.data.paths.
Setting a Variable through Code
If Blender recommends using variables instead of data paths, how do we create variables?
This is not too difficult. We will use the new function in Channel Driver Variables. We can simply write the following:
var = myDriver.driver.variables.new()
var.name = "currentFrame"
var.type = "SINGLE_PROP"
var.targets[0].id_type = 'SCENE'
var.targets[0].id = 'Scene'
The id_type is one of this list. In our case, ‘SCENE’. Id is the block within the ID type. With the default scene, we only have one scene named ‘Scene’. Finally, the data path is frame_current.
Now we replace our expression above with:
myDriver.driver.expression = ‘sin(currentFrame/10)’The warnings go away. We type:
myDriver.driver.is_simple_expressionAnd we get a result of True.
100 Cubes
This took quite a bit of code to do something that is very quick in the UI. However, with this code, we can now create add-ons that create specific types of drivers. We could also add a driver to hundreds of objects with a single click. For example, if I have 100 cubes that need a driver, I can use the following script to iterate through and add the driver.
import bpy
import random

# script to create 100 cubes and assign drivers

for index in range(0,100):
    # Create a random position
    x = random.uniform(-10,10)
    y = random.uniform(-10,10)
    z = random.uniform(-10,10)

    # Create a cube at our random location
    bpy.ops.mesh.primitive_cube_add(location=(x,y,z))

    # Add the driver to the cube
    myDriver = bpy.context.object.driver_add('location',2)

    # Create the expression. In this expression, we use a random
    # number between 0 and 1 to make each cube bounce at a different speed.
    myDriver.driver.expression = 'sin(frame/' + str(random.uniform(0,1)*10) + ')'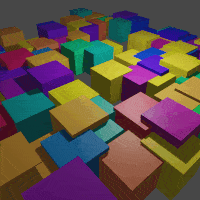
Driving with Custom Properties
You can also use drivers in Blender to drive custom properties. For example, this code creates a property and sets a driver to the property.
bpy.types.Object.myProp = bpy.props.FloatProperty()
myDriver = bpy.context.object.driver_add(‘myProp’)
myDriver.driver.expression = ‘sin(frame/10)’
We can check if this is properly set by looking in the driver editor. I wish it was possible to use the evaluate function to get the driver value, but it only returns the input frame number (if you look in the graph, the f-curve graph also just shows the frame number).

Custom Functions: Not for the Faint of Heart
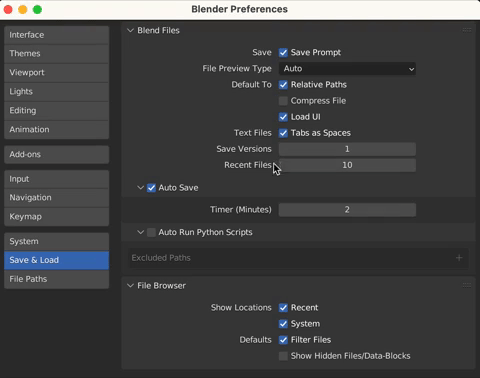
The last item we will create for our drivers is a custom function that is called every time the driver is updated. I say this is not for the faint of heart for two reasons. First, it is very slow. As noted above, the basic driver expressions are optimized to be fast. However, there are circumstances where we may need more than a simple expression. Second, this is disabled by default. This is a security protection to protect against dangerous code. You will have to enable autorunning Python scripts in the options.
Turn On Python Autorun
To turn on Python autorun go to the Preferences (Edit->Preferences->Save & Load).
Writing the Script
Our script is simple. We create a new script file called bounce.py. Next, create a function that does the exact same thing as we wrote in the driver expression.
import bpy
import math

def customFunc():
    return math.sin(bpy.data.scenes["Scene"].frame_current/10)
Calling the script in a driver expression
To call this, we simply write the following in our driver expression:
bpy.data.texts[‘bounce.py’].as_module().customFunc()
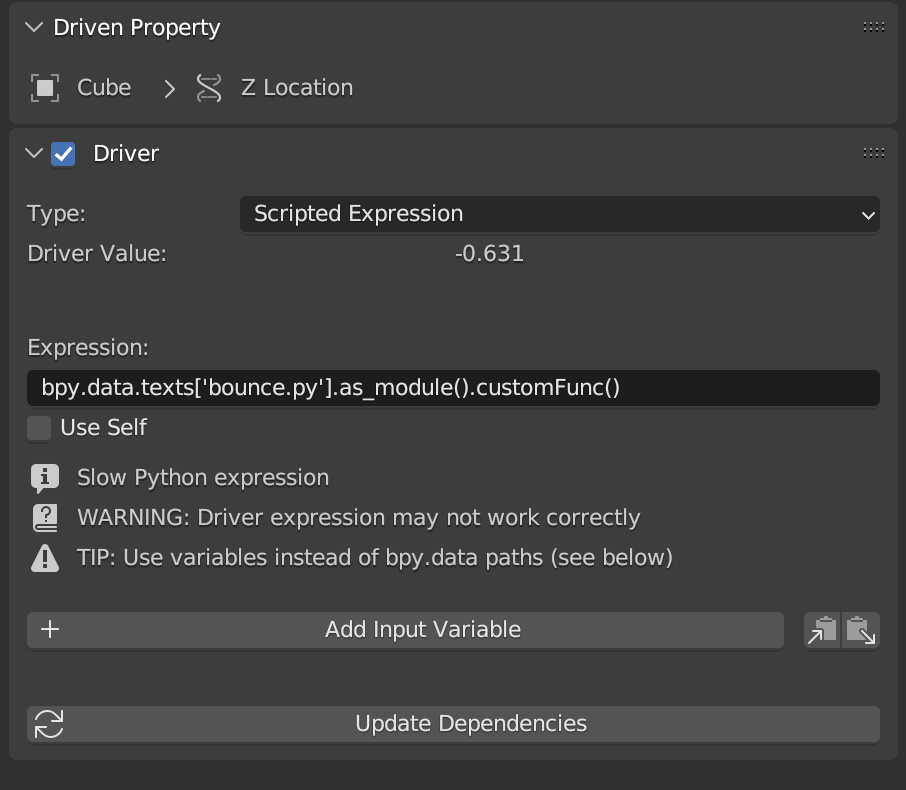
This calls the text file as a module and calls the customFunc function in the module.
Conclusion
Drivers are a powerful tool for animation. They are particularly useful for creating cyclical animations like rotation or bouncing. In this post, we showed how to create drivers and driver variables through code. We would love to know if you found this useful or if there are other areas of the Blender API that you would like us to explore. Drop a comment below.
If you enjoyed this post, consider subscribing to the newsletter where I share work-in-progress updates, upcoming tutorials, and the occasional behind-the-scenes look at what I’m building.