Now that we have the PicoGame working in Micropython, next is to create a Blockly app that helps users to create a game (and generates the Python code). The first step was just to get Blockly working. This post provides:
- An Overview of Blockly
- Why We are Using Blockly
- How to Install Blockly
- How to Change the Code Generator from JavaScript to Python
What is Blockly?
Blockly is a web application that allows users to code visually. Blockly is created by Google. Instead of users being required to know keywords and syntax for a language, the user can simply drag blocks onto a workspace. Blockly handles the actual writing of the code.
Why are we using Blockly?
I have mixed feelings about visual code editors like Blockly. My son learned his first coding with Scratch, a similar visual editor. Although it was a great way to start coding, my son has struggled to transition from Scratch to a more traditional coding language. Scratch helps with the concepts of coding, but learning keywords and syntax is still a relatively steep learning curve. Since he can do amazing things in Scratch, he is hesitant to spend the time that he needs to learn something else.
Given these mixed feelings, why am I creating a Blockly app for PicoGame? The answer is that I really want him to make games for PicoGame (both for his entertainment but also the continued development of PicoGame). Therefore, I won’t push for him to code in Python (or even worse C/C++). I am still hopeful that he will transition to another language when ready.
Installing Blockly
Installing Blockly is easy. There are three key steps:
- Install Node.js and npm
- Create an App
- Run the App
Install Node.js and npm
Blockly runs on node.js. Therefore, the first step is to install node.js. I am running a test web server on Ubuntu. Therefore, I simply need to type the following:
sudo apt update
sudo apt install nodejs
sudo apt install npm
Note that the Node.js version in the Ubuntu package manager is slightly out of date, but for our purposes this is fine (and much easier than other methods of installation).
Instructions for other operations systems can be found here.
Create an App
Once we have Node.js and npm installed, we can create a template Blockly app. This is really easy. You simply need to type:
npx @blockly/create-package app picoblocksRun the App
To run, we simply go into the directory picoblocks and type:
npm startNow, we can access by going to the IP address port 8080. For example, on my local network, my test server is at:
192.168.1.54:8080
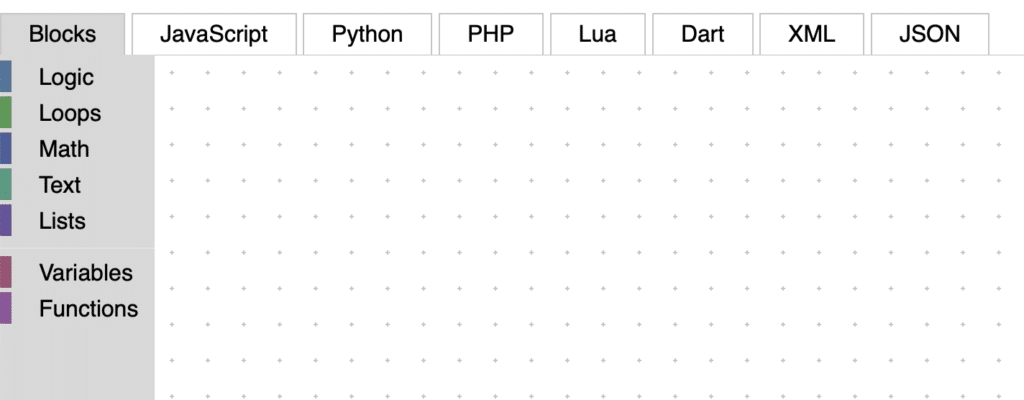
If everything works, you should see the basic Blockly workspace.

The current code generation language is JavaScript. If you drag in a few blocks, you should see the generated JavaScript code on the left.
To stop Blockly, you can press ctrl-c.
Changing from JavaScript to Python Generator
Now that we have the JavaScript Generator running, let’s change it to Python. We need to make a few minor changes. We will need to change 1 file, index.js. We are looking for the following lines:
import {forBlock} from './generators/javascript';
import {javascriptGenerator} from 'blockly/javascript';
Object.assign(javascriptGenerator.forBlock, forBlock);
const code = javascriptGenerator.workspaceToCode(ws);
Replace references to javascript with python:
import { forBlock } from './generators/python';
import { pythonGenerator } from 'blockly/python';
Object.assign(pythonGenerator.forBlock, forBlock);
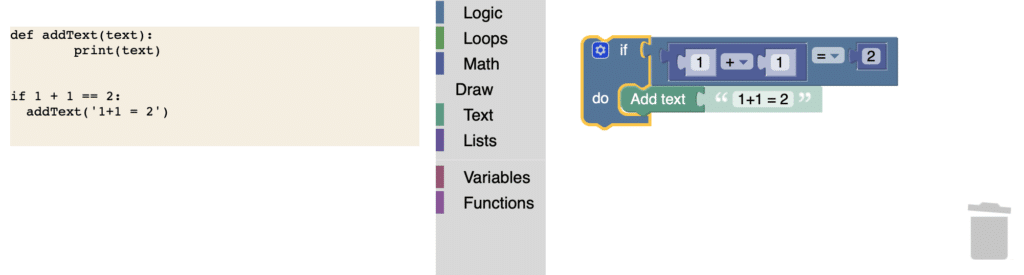
let code = pythonGenerator.workspaceToCode(ws);Run again, and drag some test blocks into the workspace. You should now see the generated code on the left side.
This is a big step toward having a tool that can visually create code. In future posts, we will create blocks that are specific for our PicoGame code.