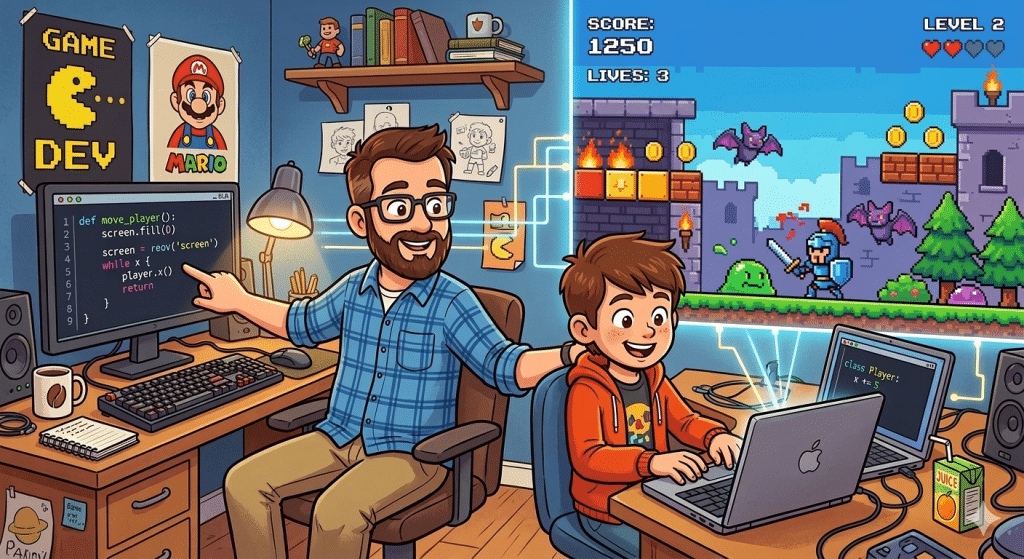
Recently, my son and I participated in a game jam. While a lot of fun, it was equal parts stressful and educational. I talked about my overall experience in this post. Today, I am going to focus on implementing Godot multiplayer in a browser game.
The game is called Jesvilemys. Players run around, punch each other, and interact with items that have randomized effects. It’s chaotic and fun. Getting multiplayer to work in the browser turned out to be the most technically interesting part of the whole project.

This post is about how we built the Godot multiplayer infrastructure: what the architecture looks like, how the pieces fit together, and the specific Godot patterns that made it work.
The Architecture
To start, it helps to understand how we structured the system. There are parts:
- A Python WebSocket Signal Server: clients connect to this first to get assigned to a game.
- Headless Godot Game Servers: one process per active game session, each on its own port (runs the server side game code).
- Browser Clients: connect directly to the Godot game server once they have a port.
The flow looks like this:
Browser client
- connects to Python signal server (port 8080)
- receives a port number
- connects to headless Godot server (port 50000–60000)
- plays the game
The reason we split matchmaking from gameplay is that they have different jobs. The signal server is lightweight. It just needs to hand out port numbers and manage the pool of running Godot instances. The game server is where the actual simulation runs. Keeping them separate means we can scale them independently and the game server code doesn’t have to care about session management at all.
Quick Start Requirements
Before you start coding, ensure your environment is staged with the following:
- Godot 4.x: You will need the standard version installed on your development machine and the Linux headless version on your server.
- Python 3.10+: Required to run the signal server. You’ll specifically need the websockets library (install via pip install websockets).
- Linux VPS: A basic VPS (Ubuntu is standard) to host the headless Godot instances and the Python script.
- Domain Name & SSL: A registered domain with an SSL certificate (like those from Let’s Encrypt/Certbot). Browsers will refuse a ws:// connection from an https:// site (current browsers may even block ws:// from an http:// site.
- Firewall Access: Ensure ports 80/443 (for Nginx) and your game’s port range (50000–60000) are open or properly routed.
The Signal Server (Python)
The signal server has two files: signal_server.py handles WebSocket connections, and server.py manages the pool of Godot instances. Note, this code was written quickly as I was exploring options to implement. It is not an example of good class and function names.
Managing the Instance Pool
server.py defines two classes. JServerInstance (the J stands for the game name Jesvilemys) represents a single running Godot process:
class JServerInstance:
    def __init__(self, id: int):
        self.id = id
        self.process, self.ip_addr,self.port = launch_instance()
        self.status = 'running'
self.clients = []When a JServerInstance is created, the launch_instance() function picks a random port in the 50000–60000 range, checks that it’s actually free, then spawns the process:
def launch_instance():
    godot_path = "godot4"  # "godot" must be in PATH
    relative_instance_path = "~/Jesvilemys/"
    instance_path = os.path.expanduser(relative_instance_path)

    # Path to the scene you want to load (relative to project root)
    scene_path = "res://scenes/world.tscn"

    # Get the ip address
    with open("../config.json") as f:
        config = json.load(f)

    SERVER_IP = config["server_ip"]

    # Find a random open port
    port = random.randint(50000, 60000)
    while is_port_in_use(SERVER_IP, port):
        port = random.randint(50000, 60000)

    print(f"Launching: {godot_path} --headless --path {instance_path} {scene_path} -- --ip_addr={SERVER_IP}")

    # Launch headless Godot
    process = subprocess.Popen([
        godot_path,
        "--headless",            # Run without rendering (no window)
        "--path", instance_path, # Specify project path
        scene_path,               # Scene to load
        "--",
        f"--ip_addr={SERVER_IP}",
        f"--port={port}",
        "--server"
    ])
return (process, SERVER_IP, port)The –headless flag runs Godot without a window or renderer, which is what you want for a server. The — separates Godot’s own arguments from the user arguments we pass through to our game code.
JServer sits on top and manages the collection of instances. Its most important method is quick_launch():
    def quick_launch(self):
        '''Finds an instance with availability and returns its port.'''
        for instance in self.instances:
            if instance.get_num_players() < 4: # Assuming max 4 players per instance
                return (instance.ip_addr, instance.port)
        # If no instance has availability, create a new one
        new_instance_id = self.create_instance()
        new_instance = self.get_instance(new_instance_id)
return (new_instance.ip_addr, new_instance.port)It scans existing instances for one with room (in this case 4 players per game), and if there isn’t one, creates a new instance. The caller just gets back a port number.
Handling WebSocket Connections
signal_server.py is straightforward. Clients connect and send a JSON message with “action”: “request_port”. The server calls quick_launch() and sends back the port:
                if action == "request_port":
                    # Allocate a port
                    allocated_ip, allocated_port = port_allocator.allocate_port()

                    # Send response
                    response = {
                        "status": "success",
                        "ip_addr": allocated_ip,
                        "port": allocated_port
                    }
await websocket.send(json.dumps(response))That’s the entire matchmaking interaction. Simple by design.
Nginx Configuration
Since browser clients are restricted to secure connections (wss://) when a game is hosted on an https:// site, you need a way to bridge that secure traffic to your Godot server. We will set up a web server, in our case Nginx, to act as a reverse proxy, handling the SSL encryption (SSL termination) and forwarding the raw data to our game instances.
To implement this, you will need to edit your Nginx site configuration (typically located at /etc/nginx/sites-available/your-site). Below is a template that handles both the Python Signal Server and the dynamic Godot ports.
Nginx
server {
    listen 443 ssl;
    server_name yourdomain.com;

    # SSL Certificate Paths (usually generated by Certbot)
    ssl_certificate /etc/letsencrypt/live/yourdomain.com/fullchain.pem;
    ssl_certificate_key /etc/letsencrypt/live/yourdomain.com/privkey.pem;

    # 1. Python Signal Server Proxy
    # This routes wss://yourdomain.com/signal to your Python script on port 8080
    location /signal {
        proxy_pass http://127.0.0.1:8080;
        proxy_http_version 1.1;
        proxy_set_header Upgrade $http_upgrade;
        proxy_set_header Connection "Upgrade";
        proxy_set_header Host $host;
    }

    # 2. Dynamic Godot Instance Proxy
    # This regex captures the port from the URL (e.g., /game/50001)
    # and forwards it to the corresponding local Godot port.
    location ~ ^/game/(?<target_port>\d+)$ {
        proxy_pass http://127.0.0.1:$target_port;
        proxy_http_version 1.1;
        proxy_set_header Upgrade $http_upgrade;
        proxy_set_header Connection "Upgrade";
        proxy_set_header Host $host;

        # Keep the connection open for long gaming sessions
        proxy_read_timeout 3600s;
    }
}Breakdown of the Config
- SSL Termination: Nginx handles the https and wss handshake. This means your Godot multiplayer server and Python script can stay simple and listen for standard, unencrypted ws:// traffic locally.
- The “Upgrade” Headers: WebSockets start as HTTP requests. These headers are mandatory to tell Nginx to switch the protocol from HTTP to a persistent WebSocket tunnel.
- Regex Port Mapping: The line location ~ ^/game/(?<target_port>\d+)$ is the “magic” part. It automatically extracts the port number from the client’s URL—like /game/52341—and maps it to localhost:52341 on your server. This uses a regular expression to parse the URL.
- Timeouts: By default, Nginx might close a connection if no data is sent for 60 seconds. Setting proxy_read_timeout to 3600s (one hour) ensures players aren’t disconnected during quiet moments in the game.
How Godot Handles Multiplayer
Before getting into our specific setup, it’s worth understanding how Godot’s multiplayer is structured, because the framework shapes every decision we made.
Godot offers two multiplayer APIs.
The low-level API gives you raw access to TCP or UDP packets between peers. You control exactly what bytes go over the wire, when they’re sent, and how you interpret them. It’s flexible but complicated — you’re essentially building your own protocol on top of whatever transport you’re using.
The high-level API is built on top of that and does a lot of the work for you. It introduces two key concepts: MultiplayerSynchronizer, which automatically replicates node properties across all peers, and RPCs (Remote Procedure Calls), which let you call a function on a remote machine as if it were local. This is what we used.
Sitting underneath both layers is the transport. Godot supports two out of the box: ENet and WebSocket.
ENet is the default and the one most documentation assumes. It’s a UDP-based protocol with reliability and ordering layered on top. It is fast with low overhead, making it well-suited to games. If you’re building a native desktop or mobile game, ENet is the right choice and you can mostly ignore that the transport exists.
WebSocket is different. It runs over TCP and is designed to work inside browsers, which have strict rules about what kinds of network connections they’re allowed to make. A browser can’t open a raw UDP socket, but it can open a WebSocket connection. This is a non-negotiable constraint for HTML5 exports.
We started with ENet because that’s what the Godot documentation leads with. It worked fine in the editor and in native test builds. But my son insisted the game be playable in the browser. He was right, because downloading adds friction, but unfortunately we made this change within the last 48 hours of the jam. The fix was switching to WebSocketMultiplayerPeer throughout. It uses the same high-level API on top, just a different transport underneath. In practice, the synchronization and RPC code didn’t need to change at all.
The Key Steps
Here’s the sequence you need to implement to get WebSocket multiplayer working in Godot. The rest of this section walks through each one in detail:
- Create a WebSocketMultiplayerPeer on the server and assign it to multiplayer.multiplayer_peer. This activates Godot’s high-level multiplayer system.
- Create a WebSocketMultiplayerPeer on each client and connect it to the server’s URL using create_client().
- Poll the peer every frame on both server and client. WebSocket does not update itself — you must call peer.poll() in _process().
- Spawn player nodes when peers connect by listening to the peer_connected signal. Name each node with the peer’s ID.
- Assign multiplayer authority to each player node in _enter_tree() so Godot knows which client owns which player.
- Guard input processing with is_multiplayer_authority() so only the owning client runs physics and input for its player.
- Use MultiplayerSynchronizer to automatically replicate node properties (position, velocity) from the authority peer to all others.
- Use RPCs for discrete events like hits, game state changes, and score updates.
The Lobby (Godot)
On the client side, the lobby scene handles the WebSocket connection to the Python signal server before the game starts. Before any Godot o Godot multiplayer happens, this handshake has to succeed.
Setting Up the WebSocket Connection
At the top of your lobby script, declare a WebSocketPeer and the signal server URL. Note, since we are playing in the browser the wss:// scheme is required. A browser will refuse a plain ws:// connection:
var websocket := WebSocketPeer.new()
var connection_url = "wss://yourdomain.com/signal"
var is_connecting = false
var request_sent = falseTo initiate a connection, call connect_to_url(). This does not block — it just starts the process. The connection will complete asynchronously over the next few frames:
func request_game_port():
    var err = websocket.connect_to_url(connection_url)
    if err != OK:
        push_error("Failed to connect to WebSocket: " + str(err))
        return

    is_connecting = true
request_sent = falseThe Polling Pattern
The most important thing to understand about WebSocketPeer is that it does not update itself. Unlike higher-level networking APIs that run their own event loops, WebSocketPeer requires you to call websocket.poll() manually on every frame. If you forget this, the connection state will never advance and no messages will ever arrive.
Put your polling logic in _process():
func _process(_delta):
    if not is_connecting:
        return

    websocket.poll()

    var state = websocket.get_ready_state()

    match state:
        WebSocketPeer.STATE_OPEN:
            if not request_sent:
                var request = JSON.stringify({"action": "request_port"})
                var err = websocket.send_text(request)
                if err == OK:
                    request_sent = true

            while websocket.get_available_packet_count() > 0:
                var packet = websocket.get_packet()
                var response = packet.get_string_from_utf8()
                handle_port_response(response)

        WebSocketPeer.STATE_CLOSING:
            pass

        WebSocketPeer.STATE_CLOSED:
            var code = websocket.get_close_code()
            var reason = websocket.get_close_reason()
            print("WebSocket closed with code: %d, reason: %s" % [code, reason])
            set_process(false)
is_connecting = falseget_ready_state() returns the current connection state. When the state reaches STATE_OPEN, you’re connected and can send messages. We use a request_sent flag rather than checking get_available_packet_count() to prevent sending duplicate requests across frames. Once packets are available, we drain them in a while loop rather than an if, because multiple packets could arrive in a single frame.
Handling the Port Response
When the signal server responds, it sends back both a port and an IP address. Parse the JSON and store both in your Globals autoload before transitioning scenes:
func handle_port_response(response: String):
    var json = JSON.new()
    var parse_result = json.parse(response)

    if parse_result == OK:
        var data = json.data

        if data.has("port"):
            Globals.set_port(int(data["port"]))
        if data.has("ip_addr"):
            Globals.set_ip(data["ip_addr"])

        websocket.close(1000, "Port received")
        start_game()
    else:
push_error("Failed to parse response: " + response)Passing State to the Game Scene
Scene transitions in Godot don’t carry local variables. You need a way to pass the port and IP from the lobby into world.tscn after the scene changes. For this we use an autoload singleton — a script that persists across all scene transitions.
Create globals.gd and register it as an autoload in Project → Project Settings → Autoload:
extends Node

var port: int
var ip_addr: String
var is_server = false
var player_name: String

func set_port(port_num: int):
    port = port_num

func set_ip(ip_num: String):
    ip_addr = ip_num

func get_port() -> int:
    return port

func get_ip_addr() -> String:
return ip_addrThen in your lobby, store the values and change scenes:
func start_game():
    var port = Globals.get_port()
    print("Starting game on server port: ", port)
get_tree().change_scene_to_file("res://scenes/world.tscn")When world.tscn loads, it reads Globals.get_port() and Globals.get_ip_addr() to establish its own connection to the game server.
The Headless Game Server (Godot)
The headless Godot server runs the same world.tscn as your clients. There’s no separate server scene. The game code branches its behavior based on the Globals.is_server flag. This means the server and client scene trees stay in sync, which avoids a whole category of node-path bugs when routing RPCs.
Reading Command-Line Arguments
When Python launches the headless Godot process, it passes arguments like –port=52341 and –server. The Godot code reads these at startup in server.gd, which is registered as an autoload so it runs before your main scene:
extends Node

var ip_addr
var port
var peer: WebSocketMultiplayerPeer

func _ready():
    var user_args = OS.get_cmdline_user_args()

    for arg in user_args:
        if arg.begins_with("--ip_addr="):
            ip_addr = arg.substr(10)
        elif arg.begins_with("--port="):
            port = int(arg.substr(7))
            Globals.set_port(port)
        elif arg.begins_with("--server"):
            Globals.is_server = true

    if Globals.is_server:
        start_server()

func start_server() -> void:
    peer = WebSocketMultiplayerPeer.new()
    peer.create_server(port)
multiplayer.multiplayer_peer = peerUse OS.get_cmdline_user_args() rather than OS.get_cmdline_args(). In case they look the same to you, note that the first one includes “user” and the second does not. Arguments after — in the launch command are “user args” and won’t be consumed by Godot’s own argument parser. The first function returns only the user arguments.
Once multiplayer.multiplayer_peer is set, Godot’s multiplayer system is active: multiplayer.is_server() returns true, and peer_connected fires when clients connect.
Polling the Server Peer
Just like on the client, the server peer must be polled every frame:
func _process(_delta: float) -> void:
    if peer and peer.get_connection_status() != MultiplayerPeer.CONNECTION_DISCONNECTED:
peer.poll()Branching Server and Client Logic in the World Scene
In world.gd, use Globals.is_server to branch where behavior differs. Note that we use Globals.is_server rather than multiplayer.is_server() because the built-in check returns true when no peer is set, which can cause the client to incorrectly behave as a server before the connection is established:
func _ready() -> void:
    var port = Globals.get_port()

    if not Globals.is_server and not playing_alone:
multiplayer_node.start_client(port)The server skips start_client() entirely. Everything, such as loading levels and starting timers, runs on both. This keeps the scene tree in sync between server and clients.
Connecting as a Client
In multiplayer.gd, the client creates its own WebSocketMultiplayerPeer and connects to the server. The URL uses the wss:// scheme. On the server, we use an nginx proxy, which maps a path like /game/52341 to the correct backend port:
func start_client(port: int) -> void:
    peer = WebSocketMultiplayerPeer.new()
    var url = "wss://yourdomain.com/game/" + str(port)
    var error = peer.create_client(url)

    if error != OK:
        printerr("Failure connecting: ", error)

    multiplayer.multiplayer_peer = peer
    multiplayer.connected_to_server.connect(_on_connected_to_server)
    multiplayer.connection_failed.connect(_on_connection_failed)

func _on_connected_to_server():
    print("Successfully connected to server!")

func _on_connection_failed():
    printerr("Connection to server failed!")

func _process(_delta: float) -> void:
    if peer and multiplayer.multiplayer_peer == peer:
peer.poll()Connecting signals for connected_to_server and connection_failed gives you a reliable place to handle connection outcomes rather than guessing based on state.
Spawning Players When Peers Connect
Attach a script to your MultiplayerSpawner node that listens for peer connections and disconnections:
extends MultiplayerSpawner

@export var network_player: PackedScene

func _ready() -> void:
    multiplayer.peer_connected.connect(spawn_player)
    multiplayer.peer_disconnected.connect(remove_player)

func spawn_player(id: int) -> void:
    if not multiplayer.is_server():
        return

    var player: Node = network_player.instantiate()
    player.name = str(id)
    get_node(spawn_path).add_child(player)

func remove_player(id: int) -> void:
    if not multiplayer.is_server():
        return

    var player = get_node(spawn_path).get_node_or_null(str(id))
    if player:
player.queue_free()Two things to pay attention to here. First, only the server spawns and removes players. The is_server() guards prevent clients from doing this themselves. Second, player.name = str(id) must happen before add_child(). The node name must equal the peer ID as a string since this is what the authority system relies on. The MultiplayerSpawner automatically replicates newly added children to all connected clients.
Player Authority and Synchronization
This is the core of Godot’s multiplayer model and where most subtle bugs tend to appear.
Understanding Authority
Every node in Godot’s multiplayer system has an authority — a specific peer ID that owns that node. By default, the server (peer ID 1) has authority over everything. For a fighting game where each player controls their own character, we want each client to have authority over their own player node. The authority peer is the only one that should be processing input and physics for that node. All other peers receive synchronized state passively.
Setting Authority at the Right Time
In player.gd, authority is set in _enter_tree() rather than _ready():
func _enter_tree() -> void:
set_multiplayer_authority(name.to_int())Because the node’s name is the peer ID (set during spawning), name.to_int() gives us the correct authority value. We use _enter_tree() rather than _ready() because by the time _ready() fires, child nodes are already initializing — and some of them may check authority during their own setup. Setting it in _enter_tree() ensures it’s in place as early as possible.
Guarding Input and Physics
With authority set, guarding input processing is one line at the top of _physics_process:
func _physics_process(delta: float) -> void:
	if not playing_alone and not is_multiplayer_authority(): return

	self.handle_gravity(delta)

	if !self.disable_jump:
		self.handle_jump()
	self.handle_movement()
	if !self.disable_punch:
		self.handle_punch()

self.move_and_slide()This function runs on every machine for every player node. But only the authoritative client passes the guard and processes input. On all other machines, the function returns immediately and the node’s state is driven by the MultiplayerSynchronizer instead.
Setting Up Godot MultiplayerSynchronizer
MultiplayerSynchronizer is a node you add as a child of the node you want to synchronize. In the Godot editor, select the synchronizer node and use the inspector to add the properties you want replicated. In our case, we replicated the position, velocity, rotation, and animation states on the player. The synchronizer sends those property values from the authority peer to all others on a configurable interval. You don’t write any sync code . Instead, you just configure which properties to watch and it works.
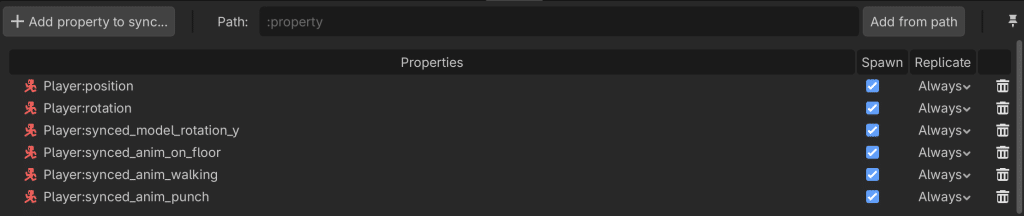
One quick Godot UI note, I struggled to find where to set the properties. I was looking for the properties in the Inspector. However, there is a separate properties tab that appears along the bottom (see the screenshot above).
Skipping Animation on the Server
The server has no renderer. Running animation logic there is wasted cycles and can cause errors if animation nodes reference visual resources. Add an early return using Globals.is_server:
func _process(_delta: float) -> void:
	if multiplayer.is_server() and !playing_alone:
		return
	if model_reference:
		handle_animation()
handle_modifiers()If not the server, then we call handle_animation() and handle_modifiers() (which applies the effects of the soul items).
Using RPCs for Discrete Events
MultiplayerSynchronizer handles continuous state replication, but for discrete events such as hits, deaths, game state changes, score updates, you want RPCs. An RPC (Remote Procedure Call) lets you call a function on a remote peer as if it were local.
Declare an RPC with the @rpc annotation:
@rpc("any_peer", "reliable")
func register_hit(attacker_id: int, victim_id: int):
    if not Globals.is_server:
        return

    # Update stats
    hit_stats[attacker_id]["hits_given"] += 1
    hit_stats[victim_id]["hits_received"] += 1

    # Calculate knockback and tell the victim
    var attacker = get_node("/root/World/%d" % attacker_id)
    var victim = get_node("/root/World/%d" % victim_id)
    var direction = sign((victim.position - attacker.position).x)
    victim.rpc_id(victim_id, "punched", Vector3(direction * 8.0, 1.0, 0.0))
The @rpc annotation takes a few parameters worth understanding:
- “any_peer” means any connected peer can call this function remotely. “authority” restricts it to the authority peer only.
- “reliable” ensures the message is delivered and in order, at the cost of some overhead. Use “unreliable” for frequent updates (like timer displays) where a dropped packet doesn’t matter.
- An optional third parameter “call_local” makes the function also execute on the machine that called it, not just the remote peers.
To call an RPC on a specific peer, use rpc_id():
victim.rpc_id(victim_id, "punched", Vector3(direction * 8.0, 1.0, 0.0))To call it on all peers at once, use rpc():
get_node("/root/World").rpc("show_game_over")One important constraint: RPCs cannot return values. They are fire-and-forget. If you need a response, you send a separate RPC back. In our game, get_stats() is called by a client, and the server responds by calling receive_stats() back on that specific client via rpc_id().
RPC Considerations
Our RPC calls work for a quickly developed game jam game. However, they would not be sufficient for a large scale game. They would be a cheater’s dream. The attacker sends an rpc to the victim. Neither the victim nor the server check whether the attacker is telling the truth. A cheater could simply send rpc’s whenever they wanted to score points for a hit regardless of whether they were close to a victim or not.
Gotchas and Lessons Learned
WebSocketPeer Won’t Poll Itself
We mentioned this above but it’s worth repeating because it cost us real time. If you’re used to higher-level networking APIs that handle their own event loops, WebSocketPeer will surprise you. Call websocket.poll() in _process() or nothing will ever happen.
Node Timing and _enter_tree
We set Godot multiplayer authority in _enter_tree() rather than _ready() deliberately. By the time _ready() fires, child nodes are already initialized and some of them might query authority during their own setup. Setting it in _enter_tree() ensures it’s available as early as possible in the node lifecycle.
Hardcoded IPs
When we started developing, we used hardcoded IP addresses buried throughout the code. However, we ran into challenges when we started using two different servers to test as we had to change the IP address in multiple places. We eventually moved this into a JSON config file shared between the Python and Godot sides, but we should have done it from the start (and the url is still hardcoded in multiplayer.md).
Server vs. Client Bugs Are Hard to Reproduce
A whole category of bugs only appear when you have multiple actual clients connected (particularly clients on different operating systems). For example, I mainly use a Mac for development. However, my son was testing on Linux. The random name generator worked perfectly on my machine, but did not work on Linux.
Running two instances locally helps, but some timing bugs only surface under real network conditions. Comprehensive logging on both the server and client sides saved us more than once.
What We’d Do Differently
WebSocketPeer from the beginning. It would have been so much easier if I had known the browser limitation of ENet from the beginning. The related improvement would have been to use SSL from the beginning. Since browser clients can only make wss:// connections when served over HTTPS. We built the whole system with plain ws:// and had to retrofit SSL termination through nginx later. It works, but it’s extra complexity that could have been designed in from the start. The part that I still haven’t figured out is how to run multiple development servers running different branches of the code since SSL requires an SSL certificate.
Config file over hardcoded values. The IP address, port ranges, and max players per instance are all values that need to change between development and production. A shared JSON config that both Python and Godot read would have saved us several tedious find-and-replace sessions.
Instance lifecycle management. The JServerInstance.stop() method in server.py currently just sets a status flag — it doesn’t actually kill the process. For a jam game this was fine, but for anything real you’d want proper cleanup when a game session ends.
Conclusion
Building Godot multiplayer into a game jam project is a lot. The architecture we ended up with is more complex than we originally planned (signal server -> headless Godot -> client), but each piece is doing a clear job and the boundary between them is clean.
Once I had the basic multiplayer framework set up, Godot’s multiplayer high-level API actually made the implementation fairly easy. Godot handles propagating state to everyone. You just need to implement rpc’s to change the state across the machines.
If you’re building a browser game in Godot and want to add multiplayer, the WebSocket path is absolutely viable. The polling requirement is a gotcha, the SSL setup is annoying, and you’ll spend more time than you expect on server/client branching, but none of it is insurmountable. And collaborating on it with my son made the whole thing worth it.