Keyframes are the foundational element of animation. Blender provides amazing functionality with keyframes. Almost any setting in Blender can be set as a keyframe. However, accessing keyframes in the Blender Python API can be a little tricky. In this post, we will talk about how to access the keyframes as well as how to add and remove keyframes.
Throughout this post, the code will print to the Blender terminal. Here is a quick overview of the terminal.
How to Access Keyframes in the Blender Python API
The basic access to keyframes is not difficult if you know where to look. The basic data structure looks like the following graphic.
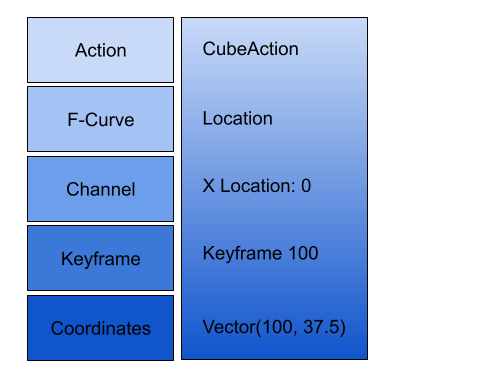
Animation data is contained in a data block called actions, which can be associated with one or more objects. Actions contain f-curves, which is short for a function curve. In Blender, the f-curve describes how the animation will transition from one keyframe to another (i.e., interpolates).
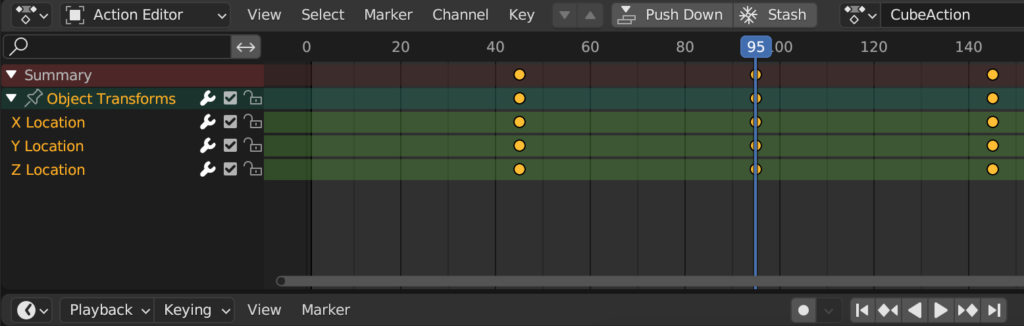
F-curves are categorized by the type of property being animated (e.g., location, rotation, or scale). Within each category, there are channels. For example, location will have 3 channels: x, y, and z (although unhelpfully, they are channels 0, 1, and 2). Finally, within each channel, there is collection of keyframes. Below is a screenshot from the action editor in Blender that gives a visual version of the hierarchy.
Set the Scene
Before I started, I added a few keyframes to the default cube so that I had keyframe data to work with. In my case, I added three location keyframes and two scale keyframes.
Action
Let’s start by getting access to an action. The most direct way is to access the action datablock. This is simply:
bpy.data.actions['NAME OF ACTION']You can easily find the name of the action. Go to the animation tab and look in the header of the action editor. You can also right click on this name and copy full data path. This is awesome functionality, which I frequently use this as a starting point when I want to learn more about a Blender property.
The code below loops through all of the actions and prints the action name:
for action in bpy.data.actions:
    print(action.name)
Another way to access the action is through the object that has the action. For example, in my case, the action is attached to a cube. Therefore, I can access through:
bpy.data.objects['Cube'].animation_data.actionOr if the object I want is currently selected:
bpy.context.object.animation_data.actionLooping through the F-Curves
Once we have the action, we can loop through the f-curves. In the code below, I am printing both the category (i.e., location) and the channel.
for curve in bpy.data.actions['CubeAction'].fcurves:
    print(curve.data_path, curve.array_index)
Show Me the Keyframes
Finally, we can access the keyframes. Within the f-curve, there is a property called keyframe_points, which contains a collection of the keyframes. We can simply loop through the collection and print the coordinates of the keyframe point (co).
for action in bpy.data.actions:
    print(action.name)
    for curve in action.fcurves:
        print(curve.data_path, curve.array_index)
        for keyframe in curve.keyframe_points:
            print(keyframe.co)
With the result:
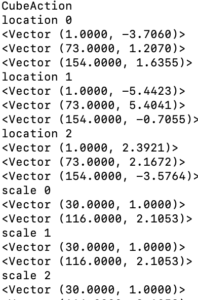
Each keyframe coordinate is a vector. The first component of the vector is the frame number. The second component is the value. In the example result above, we have location keyframes at 1, 73, and 154. With x values of -3.7, 1.2, and 1.6.
Evaluating the f-curve
As I said above, the f-curve interpolates between the keyframes. This means you can calculate the value at any point on the timeline. To do this, you simply use the f-curve evaluate method, which just takes the frame number as a parameter.
bpy.data.actions['CubeAction'].fcurves[0].evaluate(100)
This means that at frame 100, the cube will have an x location of 1.5.
Adding and Removing Keyframes in the Blender Python API
Now that we know how to access keyframes, adding and removing keyframes is easy. For example, to add a location keyframe to the currently selected object, we simply type:
bpy.context.object.keyframe_insert(data_path='location')This inserts a location keyframe at the current frame. If we want to specify a frame, we simply add the frame parameter.
bpy.context.object.keyframe_insert(data_path='location', frame=100)You can find the data path for any property by right clicking on the property and selecting “Copy Data Path”.
You can also easily remove a keyframe using a similar method.
bpy.context.object.keyframe_delete(data_path='location', frame=100)Editing a Keyframe in the Blender Python API
Editing a keyframe is also easy. You simply assign a new vector to the keyframe. For example. If we wanted to move all keyframes 5 frames to the left, we would execute the following code:
for curve in bpy.data.actions['CubeAction'].action.fcurves:
    for keyframe in curve.keyframe_points:
        currentPos = keyframe.co
        currentPos.x -= 5
        keyframe.co = currentPos
Perhaps a better case would be to move the z position keyframe values up 2 units. This would be especially useful if you had a lot of keyframes.
for curve in bpy.data.actions['CubeAction'].action.fcurves:
    for keyframe in curve.keyframe_points:
        currentPos = keyframe.co
        currentPos.y += 2
        keyframe.co = currentPos
You Can Keyframe Anything: Custom Properties
Almost anything in blender can be keyframed. You can even create custom properties that can then be keyframed. For example, if I wanted to create an integer property attached to an object, I would call:
bpy.types.Object.my_property = bpy.props.IntProperty(name='My custom property')
bpy.context.object.my_property = 5
For more information on Blender properties, see our post all about properties. Next, we can add a keyframe.
bpy.context.object.keyframe_insert(data_path='my_property', frame=100)Now, you can look in the animation tab and see that the custom property is in the action editor. Like above, we can also now evaluate the property at any frame.
bpy.context.object.animation_data.action.fcurves[0].evaluate(50)Shape Key Keyframes in the Blender Python API
Another potential use of keyframes are shape keys. Shape keys allow you to create different shapes for the mesh and then to animate (or morph) from one shape key to another.

Accessing shape key keyframes is similar to other keyframes. The only difference is that instead of accessing an action, we access shape keys.
bpy.data.shape_keysWe can iterate through shape keys in the same way:
for shape in bpy.data.shape_keys:
    print("ShapeKey", shape.name)

    for fcurve in shape.animation_data.action.fcurves:
        print("fcurve", fcurve.array_index)
        for keyframe in fcurve.keyframe_points:
            print(keyframe.co)
With a similar result.

Conclusion
As you can see, viewing and using keyframes through the Blender Python API is easy and useful. As with anything in the API, the most difficult part is figuring out the structure of the API to get access to the keyframes and the available calls to the keyframes once you have access.
Operating on keyframes through Python is particularly useful when you want to make a similar adjustment to a lot of keyframes. It would also be useful if you wanted to create keyframes based on some other data source or based on a formula (although drivers may be a good alternative for this use case).
Hopefully, you find this useful. Please let me know in the comments if you have any other use cases for Python keyframes or if there are any other parts of the Blender Python API that you would like to have explained in a future post.