

The Raspberry Pi Pico is an amazing board. It only costs $4 and provides unbelievable computing capability for such a small price. Over the past week, I have been working on creating a game engine for the Pico. The full source code is available in the Harlepengren Github repository.
I originally started with the intent of using MakeCode with the Pico. MakeCode is a block-based coding platform that allows users to progress from blocks to a text-based language, such as Python or JavaScript. For awhile, my son has wanted to create his own game system. This seemed like a great opportunity to encourage his coding skills while helping to build a game system.
R2 chips, like the RP2040, are only supported as experimental in MakeCode. After enabling the experimental features, I created a test game and downloaded the UF2 file. However, I could not get it to work despite reading a lot of different documents, Github repositories, and random posts on the Internet.
Therefore, I decided to strike out on my own and create my own basic game engine. In this post, I will cover the first steps:
- Getting Started
- Game Engine Babysteps: Loading an example game
- Creating Your Own Game
Getting Started
Getting started is easy. In this section, we will cover the basic hardware and getting up and running with the development environment.
The Basic Hardware
For this project, we have two pieces of hardware.
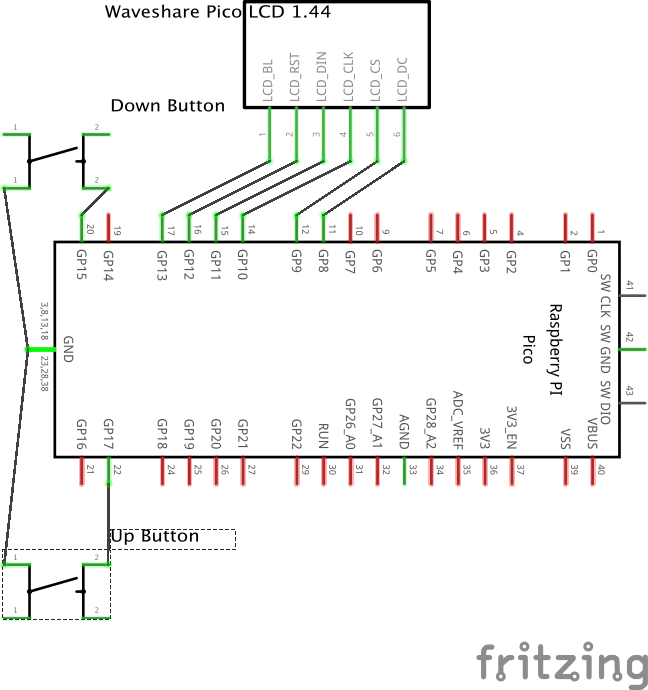
- Raspberry Pi Pico: The star of our show. This tiny development board has the processor and enough input/output pins for a screen and a few buttons.

- Waveshare Pico LCD 1.44: This is a relatively inexpensive LCD screen (although it costs more than the Pico).

What is the Raspberry Pi Pico?
The Pico has an RP2040 processor, which was designed by Raspberry Pi with a dual-core ARM M0+ processor with 264 kB of RAM and 2 MB of flash memory. Raspberry Pi also offers a version with WiFi capability.
Setting Up the Development Environment
Normally, I use Visual Studio Code. However, for the Pico, I primarily use Thonny. Thonny makes it incredibly easy to code on the Pico board. You can connect to the board, re-install MicroPython, run the REPL from the board, and add code files.
Install MicroPython
Hold down the bootsel button on the Pico and plug the USB into the computer. This should make a flash drive appear on your computer labeled ‘RPI-RP2’. Next, open Thonny, and in the bottom right corner, click on the words (it may say /dev/cu/usbmodem). This area of Thonny allows you to switch to the local Thonny interpreter or to install either MicroPython or CircuitPython on the device.
We will use MicroPython, so click “Install MicroPython”. A new pop-up will appear. Select the target volume ‘Volumes/RPI-RPI2’. For the MicroPython variant, select Pico / Pico H (unless you have the Pico W in which case you would select Pico W).
As soon as you click install, Thonny will install MicroPython onto the device and then the Pico will disconnect from the computer (usually the computer complains about properly ejecting a device). Now if you click in the bottom right corner, you should see that you are connected to the Pico.
To test, press the stop/restart button. Now you should see the files on the pico in the box on the left and the REPL for the connected Pico in the bottom window.
Using Thonny
The top window allows you to write code. When you press save, you can save to the device or to the local computer. Although focused on the device, make sure you save to the computer as well. I use save copy frequently to save to the computer and then I commit to git.
You can also upload files to the device. From the “This Computer” box in the top left, right click on the file or folder and select “Upload to”.
What is MicroPython?
You may be asking, what is MicroPython? MicroPython is a stripped down version of Python optimized to run on microcontrollers. It has core language features and core libraries. However, everything is built for a microcontroller. There are moments where this is frustrating. You want to simply add a package that you know is easy to use. However, you have to either find a MicroPython version or create something from scratch.
Wiring the Pico
The wiring for our game system is simple. We simply need to connect the LCD component and two buttons (in our game we only need up and down). We connect the LCD to pins GP8 to GP 13. For details on what these pins do, check out the datasheet. Next, we connect two buttons. You can connect these to any open GPIO; however, you will need to update the code in the Input module to match.
Game Engine Baby Steps
Now that we have our development environment ready to go, let’s get to work on the game engine.
Install the Game Engine
To install the PicoGame game engine, simply download the picogame folder and upload it to your Pico device. Uploading with Thonny is very easy, but you can also upload by command line.
Choose an Example Game
Open the example folder and drag the example to your desktop. Rename it to main.py and, in boot select mode, drag it to the Pico drive. Eject the Pico and the game should begin running. For some reason, if you upload to / through Thonny, it doesn’t work. I am guessing that in bootsel mode, it copies from the drive into a boot section of the memory.
This game is not super exciting. The player can move vertically up and down. While projectiles are spawned on the right side of the screen. There is no object of the game. But remember, the title of this section was “Baby Steps”.

Creating Your Own Game
Once you are ready to graduate beyond the examples, creating your own game is easy. You simply need to create assets, load them, and create the update function that is called every iteration of the game loop.
Create Your Assets
You can create assets in two ways. First, you can create bitmap images in an image editor. Second, and perhaps easier, you can create assets in MakeCode Arcade. Simply go into the image editor and create your image. Once done, you can switch to the code view and copy the image text. You can then use the Image.createFromString method to create the image buffer.
Subclass the Game Controller
PicoGame takes care of the screen drawing for you. All you need to do is take care of telling the engine what to draw. You can do this by creating a subclass of the game controller.
class YourClassName(GameController)You then create two methods:
- __init__()
- update()
__init__() handles initialization. Ensure you call super().__init__(). In this method, place any code to load assets or set up the AI. In example1.py, we also created lists to manage enemies and projectiles. We also created a projectile timer that is called every 1.5 seconds to create a new projectile.
The `update()` function handles everything we need to do to update a frame. First, we check for user input using the Input class. Next, we move the projectiles and enemies. Finally, we draw everything to the screen using the blit method.
Running the Game Engine
To run the game, upload the file to the Pico.
import yourfile.py
yourClass = YourClass()
yourClass.run()
Next Steps
I am amazed at what the Pico can do. The next step is to create the ability to track collisions. I would also like to add some basic physics. Are there other features that you would like to see? Let us know in the comments.
2 Comments