A few weeks ago, I posted on how to use Open Shading Language (OSL) to create a Mandelbrot texture. Today, I am showing a slightly different approach. I am showing how to use Python to generate the image, and then you can use the image as a texture. I still think I prefer OSL since I can animate the settings. This is even more true since OSL now has GPU support.
If you don’t care how to generate a Mandelbrot image, and just want a texture image you can use in your projects, here you go:
If you instead want to stick around and learn:
- Python Image Library (Pillow)
- The Code
- Putting it Together: The Shader
The code for this is available in our Blender-Tools Github repository.
Python Image Library
The best way to process images in Python is to use the Python Image Library. Originally, this library was called PIL. However, PIL was discontinued in 2011 and only works with Python 2.0. Therefore, we will use Pillow, which is a fork of PIL that works with Python 3.0.
Install Pillow
The first step is to install Pillow. Go to the blender installation directory. I am on a Mac, so I go to the applications folder, right click on Blender and “Show Package contents”. I then click: resources->3.5->python.
Next, I open a terminal window. I type “cd “ and then I drag the bin folder into the terminal. This will insert the path into terminal.
I am using Blender 3.5, my path is /Applications/Blender.app/Contents/Resources/3.5/python/bin/
Let’s check whether PIL is installed. PIL and Pillow cannot coexist. Type:
./python3.10 -m pip listThis will list the current packages. If you see pil, type:
./python3.10 -m pip uninstall pilNow, to install Pillow, type:
./python3.10 -m pip install PillowThe Mandelbrot Texture
Pillow has a built-in function to generate a Mandelbrot image. In addition, Pillow has other images that can be generated (e.g., gradient and noise). Therefore, what we describe below could apply to any image created or loaded by Pillow.
To generate a Mandelbrot image, you can use the following code:
from PIL import Image
size = (512,512)
extent = (-2,-2,2,2)
quality = 128
mandelbrot = Image.effect_mandelbrot(size,extent,quality)
Obviously, size is the size of the image. There is not significant documentation on the parameters extent and quality. My guess is that quality is the number of iterations to run before determining that the result is not headed toward infinity (see how the Mandelbrot math works in our previous post). Extent is likely the numbers in which we search. You may want to play around with these.
The Code
Now that we have the ability to generate a Mandelbrot image, we need to copy that image into a Blender texture image. I have structured the code in the following way:
- Variables to hold image settings
- Function to convert from a grayscale into a color
- Create the Mandelbrot image
- Create a Blender image texture
- Copy from the Mandelbrot to the Blender image
The Variables
This section is not complicated. We create variables to hold the basic settings (e.g., size, extent, quality). In addition, we create two color variables. One holds the color of the generated image and the other determines whether to invert or not. I primarily leave color at white (0xffffff) and then handle any color changes through shader nodes (see below). However, having a variable for color gives you other options.
# Image Settings
height = 2048
width = 2048
extent = (-2,-2,2,2)
quality = 512

# color of the image
color = 0xffffff
invert = False
Function to Convert Grayscale to Color
The function to convert grayscale into a color may be the most complicated part since it involves binary math.
Blender texture images have a default bit depth of 32. This means that Red, Green, Blue, and Alpha channels each get 1 byte (or 8 bits) to describe the color. For our purposes, we are not touching the alpha channel. Therefore, we will work with 3 bytes. We can represent using 24 0s and 1s, but that is cumbersome: 101010101010101010101010. An easier way to represent this number is hexadecimal. In hexadecimal, each byte is represented by two digits. This number is 0xaaaaaa. By convention, hexadecimal numbers have the prefix 0x to note that it is hexadecimal.
Bit shifting the Bits
We can access individual color channels through an operation called bit shifting. Bit shifting is just a fancy way of saying adding or removing bits. We will be shifting right, which means removing bits. The sign for bit shifting right is >>. For example, 1010 1111 >> 4 = 1010.
Therefore, if we want to access the red color in 0xaaaaaa, we can simply shift right 16 bits. 0xaaaaaa >> 16 = 0xaa.
Green and blue are slightly more complicated. We need to shift but also mask out bits that we don’t want. We can mask using the and operation, represented by the sign &. As a reminder, two bits with the and operation result in 1 only if both bits are 1. 1 & 1 = 1, but 1 & 0 = 0. I can use and to mask. For example, if I have the color 0xaaeecc and I want green (the middle 2 digits), I would use the mask 0x00ff00. Applying this to our sample color: 0xaaeecc & 0x00ff00 = 0x00ee00.
The final step is to divide by 0xff, which will give us a result between 0 and 1.
Color Conversion Code
Here is the full code:
# function to convert mandelbrot to a color
def getColor(input, channel):
    if channel == 'R':
        bitshift = 16
    elif channel == 'B':
        bitshift = 8
    elif channel == 'G':
        bitshift = 0

    if invert:
        return (((color >> bitshift) & 0xff) & input)/0xff

    return 1 - (((color >> bitshift) & 0xff) & input)/0xff
Creating the Mandelbrot Texture Images
Now that we have the basics, let’s put it together. First, we create a new Blender image. We name it Blender and set the width and height.
# create a new image
mandelbrot_image = bpy.data.images.new("Mandelbrot", width=width, height=height)
Next, we create the PIL Image effect_mandelbrot with our size, extent, and quality settings.
# Generate the mandelbrot
mandelbrot = Image.effect_mandelbrot((width,height),extent,quality)
We also create a buffer to hold our pixels called pixelData. The pixel buffer is the size of width x height. We will store a 32 bit number in each element of the list. We start with a None list so we can use the subscript as we place.
# Create empty list of pixels
pixelData = [None]*height*width
Now we loop through all of the pixels in the image. We get the grayscale value at the current pixel, we convert it, and we store it.
# Loop through the data
for y in range(height):
    for x in range(width):
        currentPixel = mandelbrot.getpixel((x,y))
        pixelData[(y*width)+x] = [getColor(currentPixel,'R'),
            getColor(currentPixel,'G'),
            getColor(currentPixel,'B'), 1.0]
At this point, we have a list of lists. pixelData is a list and each element is a list composed of the channels (red, green, blue, and alpha). We need to convert into a single list. As I researched ways of converting to a single list, I found this code.
pixelData = [channel for pixel in pixelData for channel in pixel]However, I am not happy with the code. I do not think it is Pythonic. Specifically, I think it violates the Zen of Python (Pep 20):
- Simple is better than complex
- Sparse is better than dense
However, I kept it because it is more memory efficient. The best alternative I thought of was to create another list, but this would double the amount of memory used. If anyone has proposed alternatives, I would love to see them in the comments.
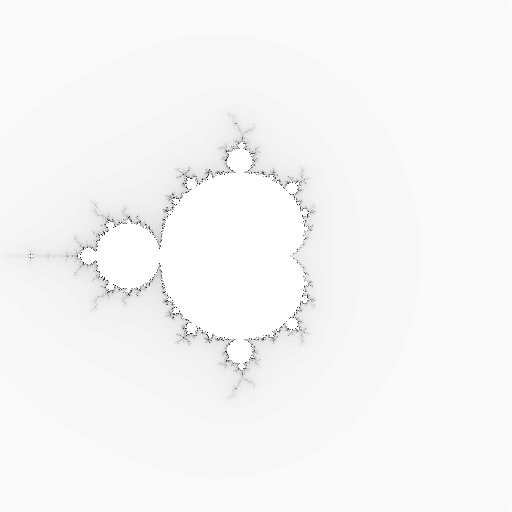
Putting Everything Together
Now that we have the code in place, we run it and generate an image like this.
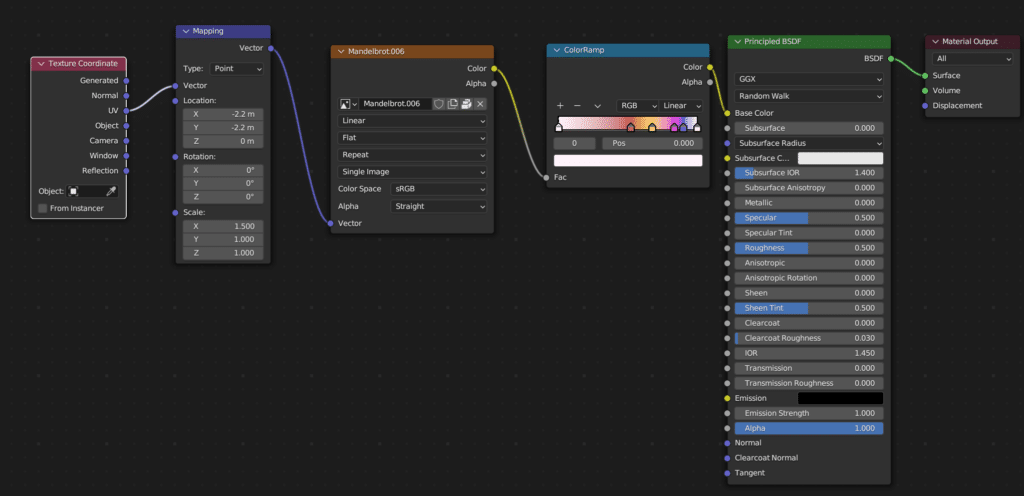
We simply need to create a shader with an image texture. I also added a ramp.
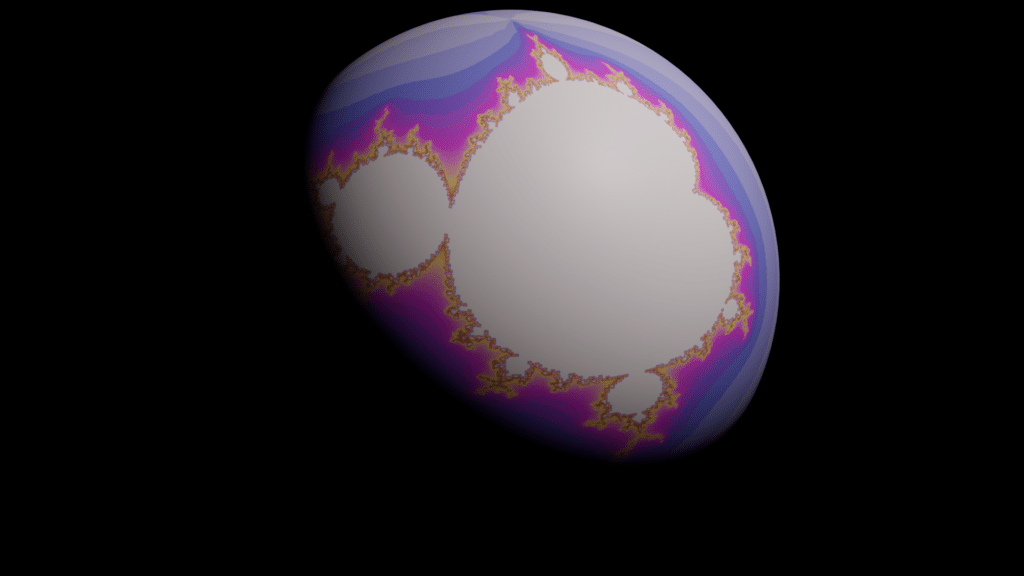
This resulted in the following image.
Next Steps
Hopefully, you found this helpful. As I noted in the intro, I will probably still use the OSL version, but it is nice to have alternatives.
Right now, the code is built to simply to generate an image. If we instead wanted to create an operator, it would be easy to change the code into a function that could be called by an operator. See our previous post on how to create an operator.