
Blender is one of the reasons that I started learning Python. I wanted to better understand the scripting side of Blender (in particular a Blender Python operator). However, despite significant growth learning Python, I don’t feel like I have progressed very far on the Blender API. One challenge is the documentation. The documentation provides a few initial examples, but is rather sparse.
Therefore, I want to share what I have learned about the Blender API in hopes that it speeds up others’ development. In the process, we will understand how to access built-in properties, develop a simple operator, and then create a more complex operator with a UI panel.
The code for this post is available at the Harlepengren GitHub repository.
Getting Started
First, you need to understand properties versus operators. Properties are like variables. They store something about the object or the scene. For example, location is a property that stores the location of the object. Operators on the other hand do something. The subdivide operator subdivides the edges in the mesh.
Properties
For properties, it is easy to find the name of the property. You simply right click on the property and select Copy Full Data Path. For example, with the default cube selected, right click on the number to the right of Location X and select Copy Full Data Path. You can then paste this into the Python Console and hit enter.
bpy.data.objects["Cube1"].location[0]The console then shows 0.0. You can also change this from the console. Type
bpy.data.objects["Cube1"].location[0] = 1.0This will move the cube 1 to the right. I used this technique to get and set the path for the location of the camera in the camera rotation script.
Blender Python Operator
Operators are a little more difficult. They do not appear to have the right click, copy data path functionality (although if they do, please let me know in the comments). Instead, you will need to look at the API documentation.
Once you find the operator you need, it will also describe the parameters. For example, if we want to use the subdivide operator.
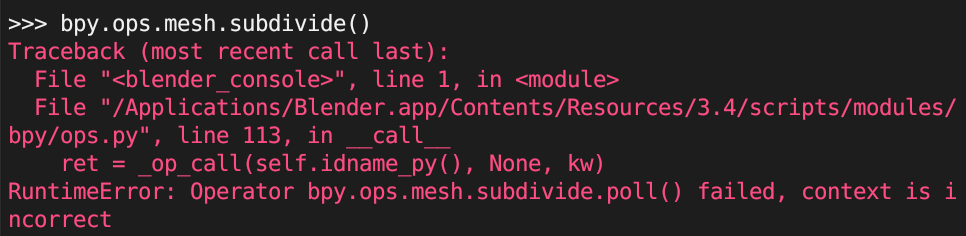
Before we call this operator, there are two important things to know. First, operators work on the active object. Intuitively, this makes sense. When you are using Blender non-programmatically, in order to subdivide the cube, you select the cube before you subdivide. Python works the same way, you need to select the object you want to subdivide first.
Second, you need to use the operator in the correct context. Again, this makes sense if you think about the way you use Blender. To subdivide the cube, you need to switch to edit mode.
Once you have selected the cube and switched to edit mode, you can type the following statement in the Python console:
bpy.ops.mesh.subdivide()The fact that generally you do not call an operator as a method of a mesh (there are exceptions) and the context of the operator were both difficult to understand when I started using Blender Python. I frequently saw the error below.
Extending Types
Python scripts in Blender work by extending the Blender classes. The base class for properties is bpy.types.Property and for operators is bpy.types.Operator. We will extend these by creating subclasses that add our own functionality. In case you need a refresher on Python class inheritance. If you don’t mind an older book using C++, I highly recommend Simple C++ to learn the basics of object oriented programming. Although, I am sure there are better books today.
Our First Blender Python Operator
Now that we understand the basics, let’s build an operator using the operator class. As mentioned above, operators perform an action in Blender. This can be as simple as printing something to the console or as complicated as subdividing a mesh.
The Code
The following is a shortened version of the Blender documentation example, but let’s explain what is happening:
import bpy

class HelloWorldOperator(bpy.types.Operator):
    bl_idname = "wm.hello_world"
    bl_label = "Minimal Operator"

    def execute(self, context):
        print(context, context.mode, context.object)
        print("Hello World")
        return {'FINISHED'}

# Register and add to the view menu (required to also use F3 search "Hello World Operator" for quick access).

bpy.utils.register_class(HelloWorldOperator)
Declaring the Class
We start by declaring a class HelloWorldOperator that is a subclass of bpy.types.Operator. A subclass (or derived class) inherits basic functionality from a parent class (in the case bpy.types.Operator) and adds its own functionality.
We then give the class a name and label. The naming convention here is deliberate — see the next section for a full explanation.
The bl_idname Naming Convention Explained
Blender enforces a strict naming convention for operator class names and their bl_idname. If you get it wrong, Blender will raise an error on registration — and it’s one of the most common stumbling blocks for new add-on developers.
The class name must follow the pattern CATEGORY_OT_name:
CATEGORY— an all-caps prefix identifying the context area your operator belongs to (e.g.OBJECT,MESH,RENDER,WM)OT— the type separator.OTmeans Operator.name— a lowercase, underscore-separated descriptor
The bl_idname is the dot-notation version of the same name: category.name — where category is the lowercase version of your prefix, and name matches the suffix.
So these two must mirror each other:
class OBJECT_OT_bounce(bpy.types.Operator):
    bl_idname = "object.bounce"
If they don’t match, Blender raises this error on registration:
ValueError: expected '__module__'.'CATEGORY_OT_name' at position 0The OT separator is specific to operators. Other Blender types use their own separators:
| Type | Separator | Example class name |
|---|---|---|
| Operator | OT | OBJECT_OT_my_op |
| Panel | PT | VIEW3D_PT_my_panel |
| Menu | MT | VIEW3D_MT_my_menu |
| Header | HT | VIEW3D_HT_my_header |
| UIList | UL | MY_UL_item_list |
Blender’s standard categories map to context areas — object for operators that act on objects, mesh for mesh editing, render for render operations, wm for window manager actions, and so on. Use the matching standard category when one fits. You can see this in our own example: BounceOperator uses "object.bounce_operator" because it acts on an object.
If your add-on doesn’t fit any standard category — say, a specialized pipeline tool — use a short, distinctive custom prefix to avoid colliding with other add-ons. MY_TOOL_OT_do_thing is safer than OBJECT_OT_do_thing if your operator doesn’t actually operate on objects.
bl_options: Controlling Operator Behavior
bl_options is a class-level set that controls how Blender treats your operator:
class OBJECT_OT_bounce(bpy.types.Operator):
    bl_idname = "object.bounce"
    bl_label = "Bounce"
    bl_options = {'REGISTER', 'UNDO'}
If you omit bl_options, Blender uses {'REGISTER'} as the default.
| Option | Purpose |
|---|---|
REGISTER | Makes the operator appear in Operator Search (F3) and the Info header’s operator history. Include this for any operator users might want to find or repeat. |
UNDO | Creates an undo step when the operator finishes. Required for any operator that modifies scene data — meshes, objects, properties, keyframes. Omitting this is one of the most common add-on bugs: the operator runs, but Ctrl+Z doesn’t reverse it. |
BLOCKING | Blocks all other input while the operator is running. Primarily used with modal operators. |
PRESET | Adds a preset menu to the operator’s redo panel, letting users save and recall operator parameters. |
INTERNAL | Hides the operator from search and the UI. Useful for operators that should only be called programmatically. |
The UNDO flag is the one that catches developers most often. If your operator moves objects, inserts keyframes, modifies mesh data, or changes any scene property — include UNDO. Without it, the user has no way to reverse the action with Ctrl+Z.
Adding the Execute Method
This operator has one method, execute, with the parameters of self, and context. If you are familiar with classes in Python, you know that self is a reference to the current instance. The context parameter refers to the current state of Blender. Most familiar to most users, context describes the object that is currently selected and the mode (either object mode, or edit mode). This method simply prints “Hello World” to the console and returns a set containing “FINISHED”. Blender has several possible return values.
Registering the Class
The final step is to register the new class. The operator will not work if you do not register the class.
bpy.utils.register_class(HelloWorldOperator)Running the Script
Now that we have the operator. How do we actually call it? First, run the script. Assuming no errors, in the Python console, we can call it by typing:
bpy.ops.wm.hellow_world()You should see the result printed in the Python console. If it fails, you should check the console to find the error. You can add a menu item so you don’t have to type the above statement every time you want to print “Hello World” to the console. Add the following line function to the module:
def menu_func(self, context):
    self.layout.operator(HelloWorldOperator.bl_idname, text="Hello World Operator")
This function creates a menu item called “Hello World Operator”. When this menu item is selected, it will call our operator HelloWorldOperator.bl_idname. In Blender, you must add a menu item to an existing menu. You can do this by calling:
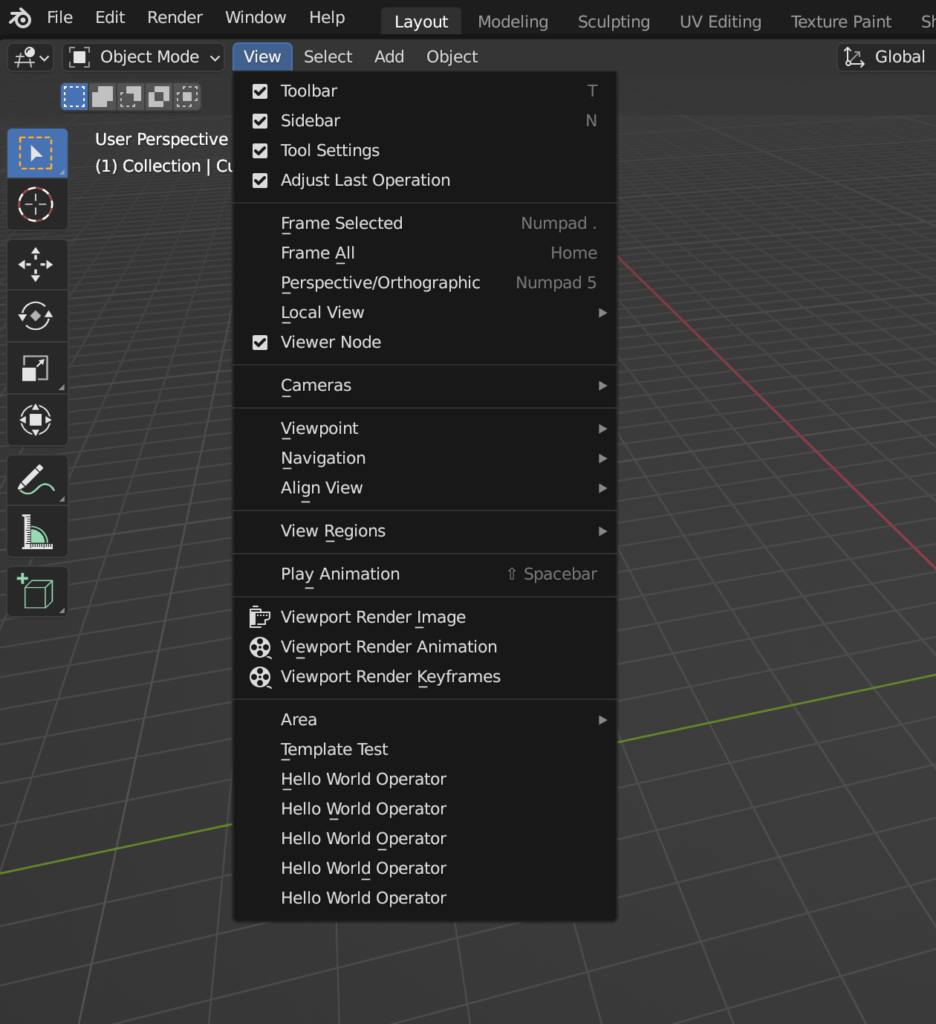
bpy.types.VIEW3D_MT_view.append(menu_func)This statement adds the operator to the 3D View: View Menu
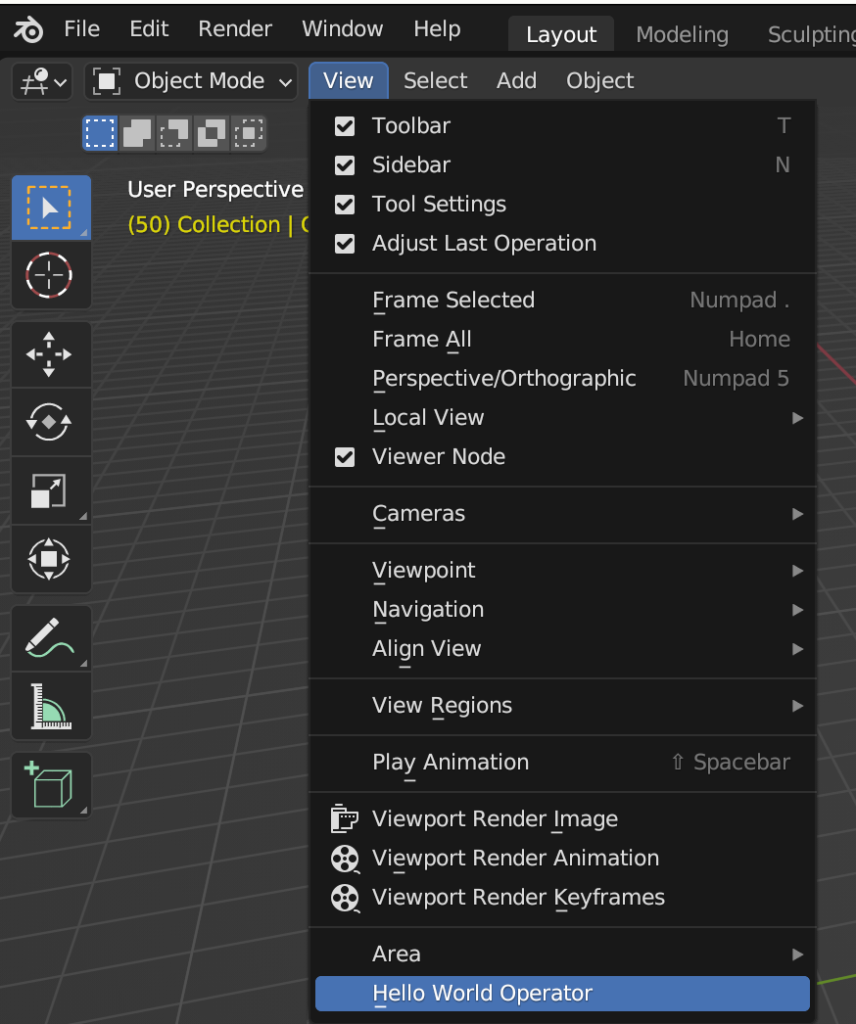
You can also execute by bringing up the search (in my case, I have spacebar set to search) and searching for Hello World Operator.
If you run this script multiple times, you may notice that every time we run the script. It adds another Hello World Operator to the menu.
We can clean up by adding an unregister function.
def unregister():
    bpy.utils.unregister_class(HelloWorldOperator)
    bpy.types.VIEW3D_MT_view.remove(menu_func)
We can call the unregister function by the following statement in the console:
bpy.data.texts["simple.py"].as_module().unregister()A More Useful Blender Python Operator
It may be that you just wanted to use Blender to print “Hello World” to the console. If so, you have everything you need. However, for most people, although instructive, this example is not very useful. Let’s create something more useful. I want to create an operator that animates an object. The object should bounce to random positions that are no greater than a given distance from the starting point (a parameter we will call radius).
As we start, if you are like me, I don’t write a lot of operators for Blender, so I always forget the classes. However, Blender offers many templates. In the text editor, click Template->Python->Simple Operator. This has more than we need, but easier to delete than to look up in the reference API.
The Code
Here is the code for our operator:
import bpy
import math
from mathutils import *
import random
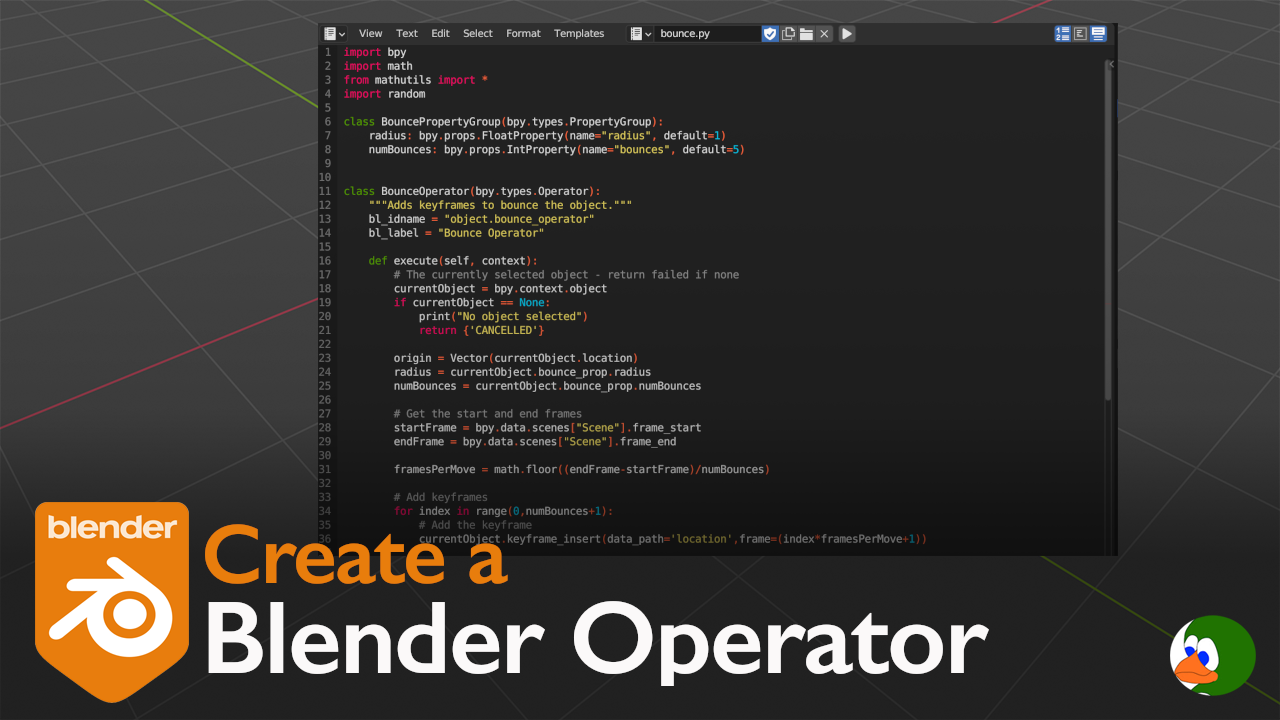
class BounceOperator(bpy.types.Operator):
"""Adds keyframes to bounce the object."""
bl_idname = "object.bounce_operator"
bl_label = "Bounce Operator"
self.radius: bpy.props.FloatProperty(name="radius", default=1)
self.numBounces: bpy.props.IntProperty(name="bounces", default=5)
def execute(self, context):
# The currently selected object - return failed if none
currentObject = bpy.context.object
if currentObject == None:
print("No object selected")
return {'CANCELLED'}
origin = Vector(currentObject.location)
# Get the start and end frames
startFrame = bpy.data.scenes["Scene"].frame_start
endFrame = bpy.data.scenes["Scene"].frame_end
framesPerMove = math.floor((endFrame-startFrame)/self.numBounces)
# Add keyframes
for index in range(0,self.numBounces+1):
# Add the keyframe
currentObject.keyframe_insert(data_path='location',frame=(index*framesPerMove+1))
# Move the object
newX = (random.random()*2)-1
newY = (random.random()*2)-1
newZ = (random.random()*2)-1
randomVector = Vector((newX,newY,newZ))*Vector((self.radius,self.radius,self.radius))
moveVector = origin + randomVector
currentObject.location = moveVector
return {'FINISHED'}
def menu_func(self, context):
self.layout.operator(BounceOperator.bl_idname, text=BounceOperator.bl_label)
def register():
bpy.utils.register_class(BounceOperator)
bpy.types.VIEW3D_MT_object.append(menu_func)
def unregister():
bpy.utils.unregister_class(BounceOperator)
bpy.types.VIEW3D_MT_object.remove(menu_func)
if __name__ == "__main__":
register()
Properties
We start by defining the idname and label:
bl_idname = "object.bounce_operator"
bl_label = "Bounce Operator"
Next, we define two properties. The first property, radius, will determine how far away from the origin the object can bounce, and numBounces determines how many times the object will bounce.
radius: bpy.props.FloatProperty(name="radius", default=1)
numBounces: bpy.props.IntProperty(name="bounces", default=5)
The syntax of these property statements initially confused me. However, I realized that these are just local variable declarations. The structure is actually a type annotation (see Python PEP 526). The types specified for both of these are Blender property types (FloatProperty and IntProperty).
The Execute Method
Next is the execute method. The execute method first determines the currently selected object. If there is no object selected, the method returns “CANCELLED”.
currentObject = bpy.context.object

if currentObject == None:
        print("No object selected")
        return {'CANCELLED'}
We set the local variable origin to the current origin of the object. We use Vector() here to create a new copy of the location that will not change as we move the object. We also get the current start and end frames that we will use to distribute the bounces.
origin = Vector(currentObject.location)

# Get the start and end frames
startFrame = bpy.data.scenes["Scene"].frame_start
endFrame = bpy.data.scenes["Scene"].frame_end
framesPerMove = math.floor((endFrame-startFrame)/numBounces)
Now we will add the keyframes. We create a loop. At each step of the loop, we add a keyframe, find a new random location and move the object to the new location.
# Add keyframes
for index in range(0,self.numBounces+1):
        # Add the keyframe
        currentObject.keyframe_insert(data_path='location',frame=(index*framesPerMove+1))

        # Move the object
        newX = (random.random()*2)-1
        newY = (random.random()*2)-1
        newZ = (random.random()*2)-1

        randomVector = Vector((newX,newY,newZ))*Vector((self.radius,self.radius,self.radius))
        moveVector = origin + randomVector
        currentObject.location = moveVector
Testing the Blender Python Operator
We can test the operator two ways. First, we can click the object menu, and we should see Bounce Operator in the object menu. This approach only allows us to use the default values for radius and bounces. Alternatively, we can call it from the Python console and change the default values.
bpy.ops.object.bounce_operator(radius=3.0, numBounces=10)Creating a Panel
Now that we have a more useful operator, we will now add a panel that makes our operator easier to use.
Global Property Group
First, we are going to make a slight modification to our script. We are going to pull the properties out of our operator and make them global. This way, we will be able to take user input on the panel and apply them to the operator. To do this, we create a Property Group that is based on the Property Group Class.
class BouncePropertyGroup(bpy.types.PropertyGroup):
    radius: bpy.props.FloatProperty(name="radius", default=1)
    numBounces: bpy.props.IntProperty(name="bounces", default=5)
We then register the class and add a pointer property to make the reference easier:
bpy.utils.register_class(BouncePropertyGroup)
bpy.types.Object.bounce_prop = bpy.props.PointerProperty(type=BouncePropertyGroup)
Next, we remove the declaration from our BounceOperator class and add a reference to the global properties.
radius = currentObject.bounce_prop.radius
numBounces = currentObject.bounce_prop.numBounces
We then replace self.radius and self.numBounces with radius and numBounces since they are no longer instance variables but are now local variables.
Creating a Panel Class
Finally, we create our panel:
class BouncePanel(bpy.types.Panel):
    bl_idname = 'VIEW3D_PT_bounce_panel'
    bl_label = 'Bounce Panel'
    bl_space_type = 'VIEW_3D'
    bl_region_type = 'UI'

    def draw(self, context):
        self.layout.label(text='Bounce')
        self.layout.prop(bpy.context.object.bounce_prop,"radius")
        self.layout.prop(bpy.context.object.bounce_prop,"numBounces")
        self.layout.operator(BounceOperator.bl_idname, text="Let's Bounce")
Similar to creating our operator, we give the panel an idname and label. Next we need to specify where this panel will appear. In our case, we want this in the 3D View side panel.
bl_space_type = 'VIEW_3D'
bl_region_type = 'UI'
We implement a draw method that will handle populating our panel. In our case, the method is not complex. We add a label, two properties that reference the global properties, and an operator (which the panel will display as a button).
Now we run the script. If we go to the 3D View side panel, we should now see Bounce Panel under the Misc tab. We can set the properties and run and we should get our keyframes.
Here is the final code:
import bpy
import math
from mathutils import *
import random

class BouncePropertyGroup(bpy.types.PropertyGroup):
    radius: bpy.props.FloatProperty(name="radius", default=1)
    numBounces: bpy.props.IntProperty(name="bounces", default=5)


class BounceOperator(bpy.types.Operator):
    """Adds keyframes to bounce the object."""
    bl_idname = "object.bounce_operator"
    bl_label = "Bounce Operator"

    def execute(self, context):
        # The currently selected object - return failed if none
        currentObject = bpy.context.object
        if currentObject == None:
            print("No object selected")
            return {'CANCELLED'}

        origin = Vector(currentObject.location)
        radius = currentObject.bounce_prop.radius
        numBounces = currentObject.bounce_prop.numBounces

        # Get the start and end frames
        startFrame = bpy.data.scenes["Scene"].frame_start
        endFrame = bpy.data.scenes["Scene"].frame_end

        framesPerMove = math.floor((endFrame-startFrame)/numBounces)

        # Add keyframes
        for index in range(0,numBounces+1):
            # Add the keyframe
            currentObject.keyframe_insert(data_path='location',frame=(index*framesPerMove+1))

            # Move the object
            newX = (random.random()*2)-1
            newY = (random.random()*2)-1
            newZ = (random.random()*2)-1
            randomVector = Vector((newX,newY,newZ))*Vector((radius,radius,radius))
            moveVector = origin + randomVector
            print(randomVector, moveVector)

            currentObject.location = moveVector


        return {'FINISHED'}

class BouncePanel(bpy.types.Panel):
    bl_idname = 'VIEW3D_PT_bounce_panel'
    bl_label = 'Bounce Panel'
    bl_space_type = 'VIEW_3D'
    bl_region_type = 'UI'

    def draw(self, context):
        self.layout.label(text='Bounce')
        self.layout.prop(bpy.context.object.bounce_prop,"radius")
        self.layout.prop(bpy.context.object.bounce_prop,"numBounces")
        self.layout.operator(BounceOperator.bl_idname, text="Let's Bounce")

def menu_func(self, context):
    self.layout.operator(BounceOperator.bl_idname, text=BounceOperator.bl_label)


def register():
    bpy.utils.register_class(BouncePropertyGroup)
    bpy.utils.register_class(BounceOperator)
    bpy.utils.register_class(BouncePanel)
    bpy.types.VIEW3D_MT_object.append(menu_func)

    # Create pointer reference
    bpy.types.Object.bounce_prop = bpy.props.PointerProperty(type=BouncePropertyGroup)


def unregister():
    bpy.utils.unregister_class(BouncePropertyGroup)
    bpy.utils.unregister_class(BounceOperator)
    bpy.utils.unregister_class(BouncePanel)
    bpy.types.VIEW3D_MT_object.remove(menu_func)


if __name__ == "__main__":
    register()
Using layout.operator() in a Panel
When you call self.layout.operator() to add a button to a panel or menu, there are several keyword arguments available beyond just text:
self.layout.operator("object.bounce_operator", text="Let's Bounce", icon='PLAY')| Argument | Type | Purpose |
|---|---|---|
text | str | Label shown on the button. Defaults to the operator’s bl_label. |
icon | str | Icon identifier from Blender’s icon set (e.g. 'PLAY', 'TRASH', 'CHECKMARK'). |
icon_value | int | Raw integer icon ID, for custom icons loaded via bpy.utils.previews. Use instead of icon when working with custom icon sets. |
emboss | bool | If False, removes the button border and renders as a flat label. Default True. |
depress | bool | If True, renders the button in a visually pressed/highlighted state. Default False. |
The depress Argument
depress is the least-documented of the group. It doesn’t change what the button does — it only changes how it looks. When True, the button renders in Blender’s “active” state, the same visual treatment a toolbar tool gets when it’s currently selected.
The practical use case is indicating state: if your add-on has a mode or condition that’s currently active, you can reflect that in the button without a separate UI element.
def draw(self, context):
    is_active = context.scene.get("my_tool_active", False)
    self.layout.operator(
        "object.my_operator",
        text="My Tool",
        depress=is_active,
    )
When is_active is True, the button appears highlighted — making it immediately clear the tool is on. When False, it renders as a normal button. Note that depress is purely cosmetic; keeping it in sync with actual state is your responsibility.
Conclusion
This was a long post, but hopefully helpful. We talked through the basic structure of properties and operators. Next, we built a basic operator. Finally, we created a panel to allow us to adjust the properties and run the operator easily. In an upcoming post, I want to update our camera rotation module to give it UI functionality and add as an add-in to make it readily available for my animation.


One Comment