
I am starting a game development log series. I will be creating a pizza delivery game with the working title Pepperoni Panic. Here is the game design document and the code. In this post, we are kicking off the development by setting up the game and creating the core car handling movement.
Basic Setup
We will start the game development by creating the basic project in Unity. In Unity Hub, we click New Project->3D Core. Note that the 3D core uses Unity’s Built-in Render Pipeline. At this point, we are more focused on the gameplay than the look. Therefore, the built-in pipeline is sufficient for our purposes. We are using Unity 2022.3 LTS for this project.
Now that we have the project, we need to add some Game Objects.
The Car Model
First, we will add a car. I am using a car from Simplepoly City. However, if you are interested in a free alternative, check out kenney.nl. The Simplepoly City assets are all in one file, so I used Blender to extract the car. I appended it to a new file (deleting the camera and light). Next, I separated the wheels from the body. I saved the Blender file in the Assets folder.

Create the Test Scene
Now, create a test scene. In Unity, File->New Scene and name the scene “TestScene”. Add a ground plane (GameObject -> 3D Object -> Plane). Next, add an empty (GameObject -> Create Empty). Name this object “Player”. Find the car model in the assets folder, and drag it onto the Player object. This will make the model a child of the Player object. You may need to scale the car to a good size for testing. We will probably adjust further when we start adding the buildings and roads.
Next, we need to add two components to the Player object. We will add all of the components to the parent Player object, not to the child model object. The two components that we will add are Box Collider and Rigidbody. The Box Collider allows us to manage collisions with other objects. The Rigidbody component allows us to apply physics to the car.
Adjust the size and center of the box collider to cover the car. You should see a faint green box around your model. You will see that the box changes when you adjust the size. Sometimes, I struggle to see the box, so I make large adjustments just to help me see the box, then I make finer adjustments to get the collision box to the right size.
Create the Car Handling Script
Now that we have the scene set up, we will create the car car handling script.
Input Systems Package
To control the car movement, we will use the Input System package. Even though this was released in 2019, I still think of this as the “new” input system. The benefit of the input system over the built-in input is you can code once for many different input controls.
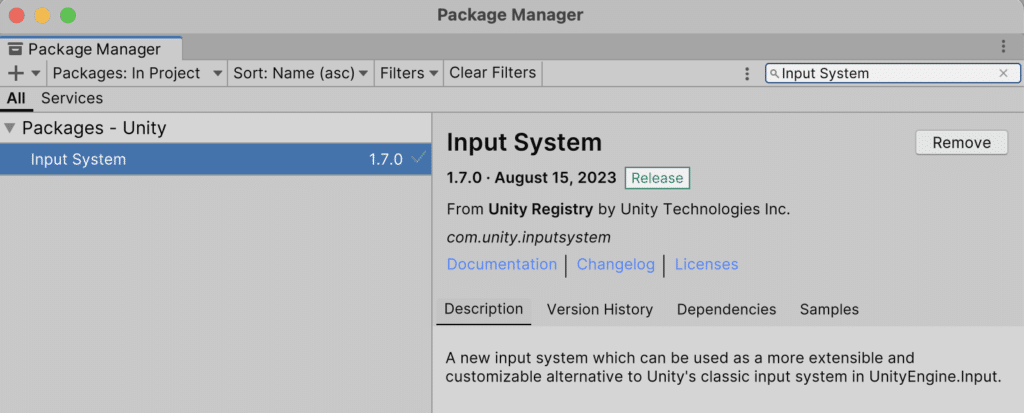
Add the Input System package. Window->Package Manager. Search in the Unity Registry for Input System.
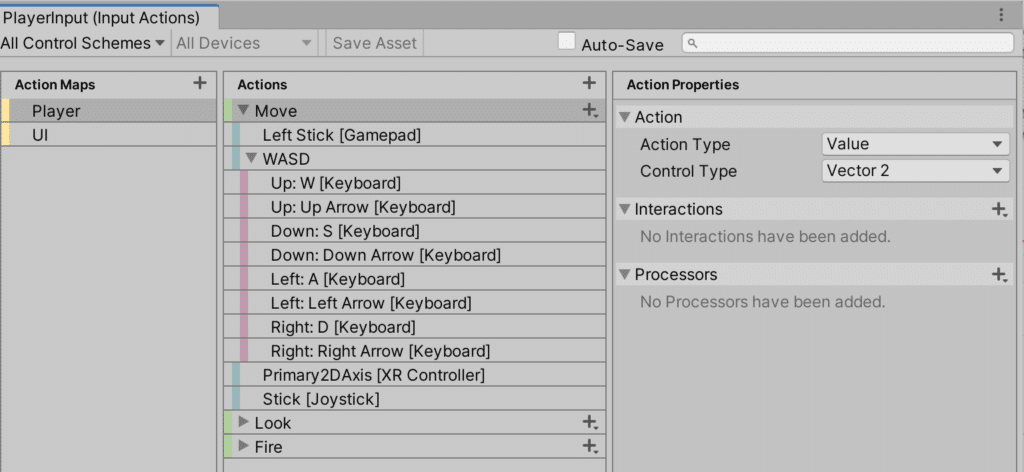
On our Player object, add a Player Input component and create an Input Action. In my case, I am using the default WASD movement (which also includes the arrow keys).
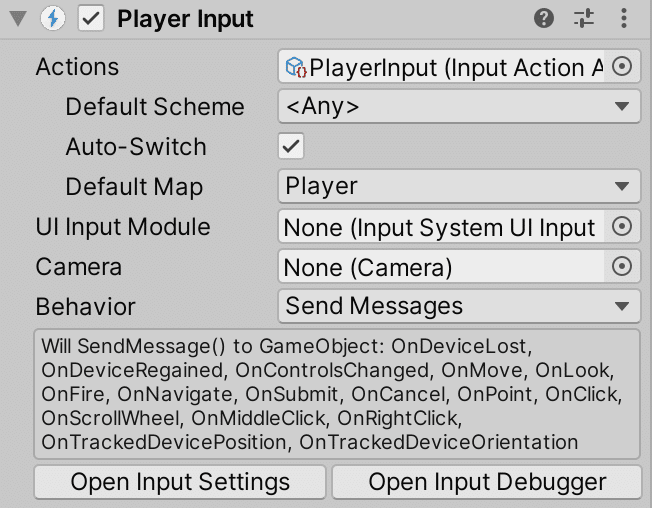
Ensure that Behavior is set to “Send Messages”.
Full Player Car Handling Code
Now we will write the code. Here is the full code:
using System.Collections;
using System.Collections.Generic;
using System.Runtime.InteropServices.WindowsRuntime;
using UnityEngine;
using UnityEngine.InputSystem;

public class PlayerMovement : MonoBehaviour
{
    [SerializeField] float acceleration = 20.0f;
    [SerializeField] float maxVelocity = 20.0f;
    [SerializeField] float rotationSpeed = 5.0f;
    [SerializeField] float drift = 1.2f;

    private Rigidbody rb;
    private PlayerInput controls;

    void Awake()
    {
        rb = GetComponent<Rigidbody>();

        controls = new PlayerInput();
    }

    void OnEnable()
    {
        controls.Enable();
    }

    void OnDisable()
    {
        controls.Disable();
    }

    void FixedUpdate()
    {
      Vector2 move_direction = controls.Player.Move.ReadValue<Vector2>();

        // Forward and Backward Movement
        if(rb.velocity.magnitude < maxVelocity){
            rb.AddForce(transform.forward * move_direction.y * acceleration);
        }

        // Turning
        if(Mathf.Abs(move_direction.x) > 0.2 && rb.velocity.magnitude > 1)
        {
            Vector3 rotation_amount = new Vector3(0.0f,move_direction.x*rotationSpeed * rb.velocity.magnitude/maxVelocity * drift,0.0f);
            transform.Rotate(rotation_amount);
        }

    }

}
Initialization
The first step in the code is to initialize. We create two variables to hold the player rigidbody component and the player input controls.
In the Awake method, we will initialize all three of these. As a reminder, Awake is called when the script is initialized. We can’t use Start for this, because Start is called too late.
    [SerializeField] float acceleration = 20.0f;
    [SerializeField] float maxVelocity = 20.0f;
    [SerializeField] float rotationSpeed = 5.0f;
    [SerializeField] float drift = 1.2f;

    private Rigidbody rb;
    private PlayerInput controls;

    void Awake()
    {
        rb = GetComponent<Rigidbody>();

        controls = new PlayerInput();
    }

    void OnEnable()
    {
        controls.Enable();
    }

    void OnDisable()
    {
        controls.Disable();
    }
In this code, we will also create functions for OnEnable and OnDisable.
Fixed Update
Next, we will write the heart of our code. We will create the FixedUpdate function. We have two options. We could either use Update or FixedUpdate. The difference is Update is called every frame. How much time has passed since the last call depends on the framerate of the game. FixedUpdate, by contrast, is called at a specific interval (0.02 seconds). This makes it much better for physics calculations (like movement).
The first thing we will do is read the current controls.
Vector2 move_direction = controls.Player.Move.ReadValue<Vector2>();We will break the movement into two parts: acceleration and turning.
For the acceleration, we first check whether we are at max velocity. We don’t want to accelerate forever. If below max velocity, we will add acceleration force.
Now for the turning code. We first check whether the movement amount is above a threshold amount of 0.2 and we also check whether the car is moving. We should not be able to turn if the car is sitting still. Next, we will calculate how much to rotate. The calculation is:
X direction movement * the speed of rotation * how fast we are going / max velocity * a drift factor
I added the velocity / max velocity * drift part of the equation because the car felt like it was sliding on ice. This part of the equation makes the rotation of the car depend on the speed. We turn faster the faster we are going. We add the drift factor to allow us to adjust the amount of drift. If we like the ice feel, then we can increase the drift. If we don’t like the ice feel, we can decrease (but don’t set to 0, otherwise the car won’t move).
Testing the Code
Now let’s test.
If we run and press a direction key while running, we see the following:
I made a change to the Rigidbody component on the car to freeze the X and Z rotation. This is to make the car so it cannot roll.

Camera Movement
In the example above where we tested our script, you already saw a preview of our camera movement script. This script tracks the player object in the X and Z axis.
Global Variables
We start with three variables that we make available through the unity editor:
- playerObject: The object that we want the camera to track.
- cameraSpeed: How fast the camera moves to follow the object.
- offset: Where to place the camera relative to the object.
We also have a private variable:
- threshold: variable that we use to determine when the camera is close enough to the target position.
The Update Function
In the Update function, we get the target direction of the movement with the equation:
Vector3 targetDirection = playerObject.transform.position - transform.position + offset;This is simple vector math, we subtract our current position from the player object position and we add our offset.
Next, we get the distance to our target position, which is just the magnitude of our vector.
float distance = targetDirection.magnitude;Before we move, we the camera, we check whether the distance is larger than our threshold. This is to keep the camera from jittering with tiny little movements. Finally, we move the camera by changing the transform position. We only move the camera a max of cameraSpeed*Time.deltaTime. Note that with this equation, we could actually overshoot our target. However, since we have the threshold, it won’t matter.
if(distance > threshold)
{
  transform.position = transform.position + targetDirection.normalized*cameraSpeed*Time.deltaTime;
}
This camera movement script is a good start. One potential change we may make later is to move the camera faster the farther away it is from the target.
Full Code
Here is the full CameraMovement code:
using System;
using System.Collections;
using System.Collections.Generic;
using UnityEngine;

// Camera moves in x and z directions

public class CameraMovement : MonoBehaviour
{
    [SerializeField] GameObject playerObject;
    [SerializeField] float cameraSpeed = 5.0f;
    [SerializeField] Vector3 offset;

    private float threshold = 0.2f;

    // Update is called once per frame
    void Update()
    {
        // Get the player direction
        Vector3 targetDirection =  playerObject.transform.position - transform.position + offset;
        float distance = targetDirection.magnitude;

        if(distance > threshold)
        {
            transform.position = transform.position + targetDirection.normalized*cameraSpeed*Time.deltaTime;
        }

    }
}
Backup Lights
The final feature we will talk about in this post is enabling backup lights. This is optional, but a fun feature.
To do this, I found the backup light in the model. I then created a new material (Right click in the project folder, Create->Material). Name the material BackupLights. Enable emission in the material and set the color to the default color. In my case it is red.

Backup Light Code
using System.Collections;
using System.Collections.Generic;
using UnityEngine;

public class PlayerBackupLight : MonoBehaviour
{
    [SerializeField] Material backupLights;

    private PlayerInput controls;
    private Color basicColor;
    private float backupIntensity = 2.0f;

    void Awake()
    {
        controls = new PlayerInput();

        basicColor = backupLights.GetColor("_EmissionColor");
    }

    void OnEnable()
    {
        controls.Enable();
    }

    void OnDisable()
    {
        controls.Disable();
    }

    void FixedUpdate()
    {
        Vector2 move_direction = controls.Player.Move.ReadValue<Vector2>();

        if(move_direction.y < 0){
            Color nextColor = backupLights.GetColor("_EmissionColor");
            nextColor = nextColor * backupIntensity;
            backupLights.SetColor("_EmissionColor",nextColor);
        } else {
            backupLights.SetColor("_EmissionColor",basicColor);
        }
    }
}
Backup Light Details
We will create a field in the editor to store a material. We also have variables to hold the input control, the default color, and the backup light intensity (how bright the light is).
[SerializeField] Material backupLights;We will initialize by assigning the input controls and the default color. We will also create the code to enable and disable the controls.
void Awake()
{
  controls = new PlayerInput();

  basicColor = backupLights.GetColor("_EmissionColor");
}
The actual code is not complicated. In the FixedUpdate method, we will get the input. If the move direction is in the negative y (e.g., the down button), we will multiply the current color by the intensity and set the color. If the control is not in the negative y, we will assign the default color.
void FixedUpdate()
{
  Vector2 move_direction = controls.Player.Move.ReadValue<Vector2>();

  if(move_direction.y < 0){
      Color nextColor = backupLights.GetColor("_EmissionColor");
      nextColor = nextColor * backupIntensity;
      backupLights.SetColor("_EmissionColor",nextColor);
  } else {
      backupLights.SetColor("_EmissionColor",basicColor);
  }
}
Conclusion
With this post, we are off and running on our pizza game. We started with the basic mechanics of the car movement and the camera. In the next post, we will create our city, allowing us to drive around. As we go, I reserve the right to update and improve the code that we have already created. You can always find the latest version of the code here.

2 Comments