We are in the middle of a series creating a Unity game with the working title Pepperoni Pursuit. In the prior posts, we set up the car, the city, and generated some AI traffic. In this post, we are going to create the pizza ordering system. This will create the pizza orders at pseudorandom times with random delivery locations on the map. The full code is available on GitHub.

Overview
To create the ordering system, we will create three key pieces:
- Order System: handles order creation and maintains a list of the orders.
- Game Manager: manages the game state. Eventually, this will be the connection between the orders and the UI/scoring system.
- Delivery Targeting: takes care of showing and hiding the delivery target object.
Order System
First, we will start with the order system. The order system will generate orders and keep track of the current orders. There are two key parts to the ordering system. First, we have an Order class that holds the basic order details. Second, we have an OrderSystem class that generates and keeps the list of orders.
Order Class
The Order class is very basic. It simply contains properties about an order:
- orderNumber
- customerName
- address
- startPosition
- deliveryPosition
- orderTime
- pizzaCount
- orderTotal
Hopefully, these properties are self-explanatory. Here is the full code:
public class Order {
    public int orderNumber;
    public String customerName;
    public String address;
    public Vector3 startPosition;
    public Vector3 deliveryPosition;
    public Time orderTime;
    public int pizzaCount;
    public float orderTotal;
}
OrderSystem
The order system creates a random order at a pseudorandom time.
The class has three public variables that we can change in the Unity editor:
- orderIntensity: how often we receive orders
- startLocation: location of the pizza shop
- randomPositionBounds: area in which to spawn the targets
The class has seven private variables:
- nextOrderTime: a list that keeps track of when we should generate an order
- currentOrders: a list of the existing orders that were generated
- orderUpdateTime: when is the next time that we need to update the orders
- orderWindow: the length of time for generating the orders (used with intensity to determine volume of orders)
- orderNumberIndex: keeps track of the current order number
- newOrderAction: stores the callback function for new orders
    [SerializeField] int orderIntensity; // Helps with order volume calulation
    [SerializeField] Vector3 startLocation;
    [SerializeField] Rect randomPositionBounds;
    private List<float> nextOrderTime;  // Keeps track of when to generate next orders
    private List<Order> currentOrders;
    private float orderUpdateTime;  // When to create new set of order times
    private const float orderWindow = 15.0f;
    private int orderNumberIndex;
    private Action<Order> newOrderAction;
Initialization
The order system is initialized in the Start function. We create two lists:
- nextOrderTime: creates a list of floats that tell us when it will be time to create new orders.
- currentOrders: creates the list of orders.
Finally, we generate our first order.
    void Start()
    {
        orderNumberIndex = 0;

        nextOrderTime = new List<float>();
        currentOrders = new List<Order>();


        orderUpdateTime = orderWindow;
        CreateOrder();
        GenerateOrders();
    }
Generate Orders
Next, we create a function that generates a list of times for new orders. We get a random number of orders (between 0 and the order intensity), and then for each of the orders, we generate an order creation time (between 0 and the order window).
There is a much simpler way to do this. We could simply create one nextOrderTime at a time. Originally I was planning to use a poisson distribution to generate orders. However, this was way too slow, so I removed and replaced it with the uniform random number generator.
The benefit of the approach we chose is that it could create multiple orders at the same time. This would be less likely if we generate one order at a time.
private void GenerateOrders()
    {
        int numNextOrders = UnityEngine.Random.Range(0,orderIntensity);

        if(numNextOrders > 0){
            for(int index=0; index<numNextOrders; ++index){
                nextOrderTime.Add(UnityEngine.Random.Range(0.0f,orderWindow));
            }
        }
    }
Get Random Position
This function generates a random delivery position on the map. We create a random x and z position within the bounds set in randomPositionBounds.
    private Vector3 GetRandomPosition()
    {
        float x,y,z;
        LayerMask roadMask = LayerMask.GetMask("Roads");
        Vector3 newPosition;
        int count = 0;

        roadMask = LayerMask.GetMask("Roads");

        do {
            count++;
            y = 0.12f;
            x = UnityEngine.Random.Range(randomPositionBounds.x,randomPositionBounds.x+randomPositionBounds.width);
            z = UnityEngine.Random.Range(randomPositionBounds.y,randomPositionBounds.y+randomPositionBounds.height);

            newPosition = new Vector3(x,y,z);

        } while(!Physics.Raycast(newPosition,Vector3.down,Mathf.Infinity,roadMask));

        Debug.Log("New Position: " + newPosition + " Count: " + count);

        return newPosition;
    }
We want to ensure that we create a delivery position that is accessible for the player. Therefore, we create a do while loop that will execute until we have an acceptable position.
To test the position, we are going to use the Physics.Raycast function. The raycast function generates a ray from a starting point in a given direction. The function returns true if it hits something and false if it doesn’t hit anything.
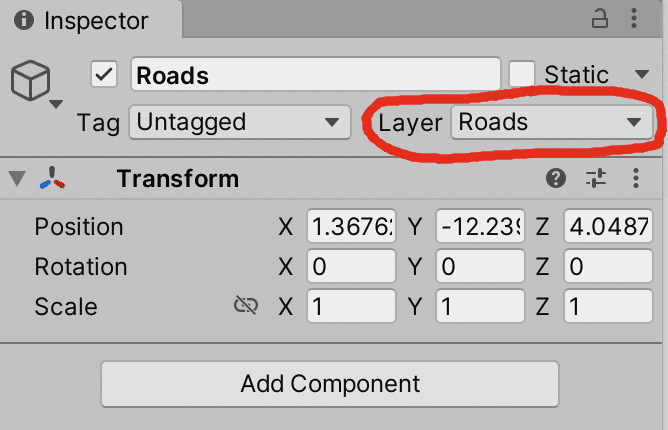
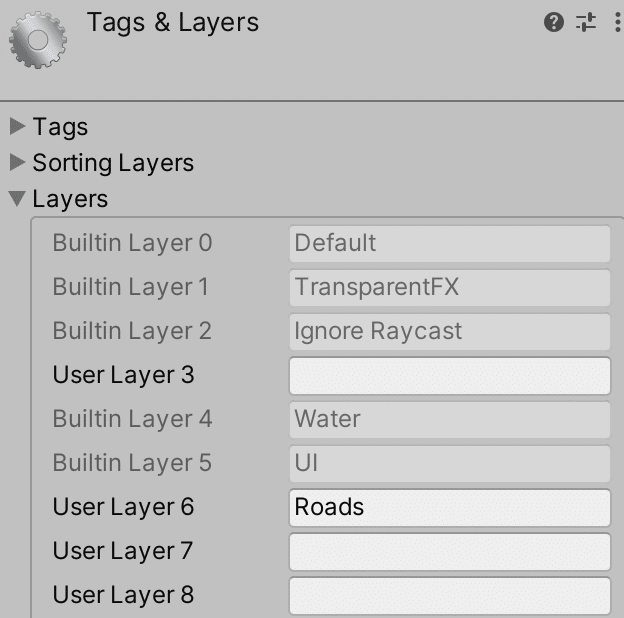
We only want to generate positions on the road. Therefore, we use a mask. The Raycast function takes the mask as a parameter. It only returns true if it hits the mask. To create the mask, we click on our roads. Then we go to the inspector and click the dropdown for Layers. Next, we click Add Layer. I added Roads as Layer 6. The final piece we need is to create a variable with the mask. To do this, we use the LayerMask.GetMask function.
Create Order
The CreateOrder function actually generates the order. For now, we have placeholder text for the customer name and address. We create a random number of pizzas and a total based on the number of pizzas. We use our random number generator code above to get the delivery location. Finally, if we have a new order callback, we call it.
private void CreateOrder()
    {
        Order newOrder = new Order();
        newOrder.orderNumber = orderNumberIndex++;
        newOrder.customerName = "Test"+UnityEngine.Random.Range(0,1000);
        newOrder.address = "Somewhere";
        newOrder.pizzaCount = UnityEngine.Random.Range(1,10);
        newOrder.orderTotal = newOrder.pizzaCount * 14.99f;
        newOrder.startPosition = startLocation;
        newOrder.deliveryPosition = GetRandomPosition();
        currentOrders.Add(newOrder);

        if(newOrderAction != null){
            newOrderAction(newOrder);
        }
    }
Order Information
We create a few functions that handle retrieving order information:
- GetNextOrder: returns the next order in the list
- GetOrderInfo: returns information about a specified order
- GetOrders: returns the full list of orders
    public Order GetNextOrder()
    {
        if(currentOrders.Count > 0) {
            return currentOrders[0];
        } else {
            return null;
        }
    }

    public Order GetOrderInfo(int orderNum){
        int index=0;

        while(index<currentOrders.Count)
        {
            if(currentOrders[index].orderNumber==orderNum){
                return currentOrders[index];
            }
        }

        // Order not found
        Debug.Log("Order not found");
        return null;
    }

    public List<Order> GetOrders(){
        return currentOrders;
    }
Deliver Order
The DeliverOrder function is called when the order is actually delivered. The function takes an order number as a parameter. We search through our list of orders. Once we find the order, we remove it from the list.
public void DeliverOrder(int orderNum){
        // Find the order and remove it
        for(int index = 0; index < currentOrders.Count; index++){
            if(currentOrders[index].orderNumber == orderNum){
                currentOrders.RemoveAt(index);
                return;
            }
        }
    }
Update
The Update function handles determining whether it is time to create new order times or to actually create an order. First, we check whether the orderWindow has passed. If so, we need to create a new set of future order times.
        orderUpdateTime -= Time.deltaTime;
        if(orderUpdateTime < 0){
            // Add some order times to the list
            orderUpdateTime = orderWindow;
            GenerateOrders();
        }
If it is not time to generate future orders, we go through our list of future orders and check whether it is time to create an order.
        else if(nextOrderTime.Count > 0) {
            for(int index = 0; index < nextOrderTime.Count; ++index)
            {
                nextOrderTime[index] -= Time.deltaTime;
                if(nextOrderTime[index] < 0){
                    // Generate order
                    CreateOrder();
                    Debug.Log("Created Order: " + currentOrders[currentOrders.Count - 1]);
                    // Remove nextOrderTime
                    nextOrderTime.RemoveAt(index);
                }
            }
        }
Delivery Target
Next, we are going to create a class to handle creating the delivery target on the screen and collision with the delivery target.
First, we create an enum called TargetType. An enum is a new variable type. Our enum will have two potential values: start target and end target. We will use this to keep track of our delivery state. The state will be either StartTarget or EndTarget.
public enum TargetType {
    StartTarget,
    EndTarget
}
The Variables
Next, we declare three variables:
- targetType: this is our enum type that will keep track of the current delivery state.
- currentOrder: the current order that we are delivering to.
- deliveryAction: this will be a callback function that we call once the delivery is complete.
The Functions
Once we have the variables, we will move on to the functions. We will have two functions:
- StartDelivery: initiates the delivery and displays the start target.
- OnTriggerEnter: handles collision with a target.
The StartDelivery function is called by the game manager when a delivery starts. The function takes two parameters: a new order and a callback function. The function sets targetType to StartTarget (meaning this is where we pick up the pizzas). We place the target object at the order start position.
    public void StartDelivery(Order newOrder, Action callback)
    {
        currentOrder = newOrder;
        targetType = TargetType.StartTarget;
        gameObject.transform.position = currentOrder.startPosition;
        deliveryAction = callback;
    }
The OnTriggerEnter function handles collisions with the delivery object. It takes one parameter, Collider other, that tells us information about the colliding object. We check whether the colliding object is the Player. Next, we determine whether this is the start target or the end target.
If this is the start target, we move the target to the delivery position, and we set the targetType to EndTarget. Otherwise, if this is the EndTarget, we will call the deliveryAction callback. This tells the game manager that we delivered the pizzas. Finally, we destroy the object.
    void OnTriggerEnter(Collider other)
    {
        if(other.name == "Player")
        {
            if(targetType == TargetType.StartTarget){
                // Move to the end point
                gameObject.transform.position = currentOrder.deliveryPosition;
                targetType = TargetType.EndTarget;
            } else if(targetType == TargetType.EndTarget){
                if(deliveryAction != null){
                    deliveryAction();
                }

                Destroy(gameObject);
            }
        }
    }
Game Manager
Now that we have an order generator and a delivery target, let’s move on to the game manager. Game manager will handle key tasks for running the game. For example, we will keep track of the score in the game manager. We need to connect the order generation system with the game manager. This will allow the game to increase the score when pizzas are delivered (or decrease the score when an angry customer doesn’t get their order).
Variables
The class takes one public variable and two private variables:
- target: the target game object used for delivery.
- orderSystem: the order system class described above.
- currentOrder: the current order we are working on.
    [SerializeField] GameObject target;
    private OrderSystem orderSystem;
    private Order currentOrder;
Start
The start function finds the pizza shop object and gets the attached order system. It sets the order system callback to the function NewOrderCallback. This function will be called when the order system generates a new order.
    void Start()
    {
        orderSystem = GameObject.Find("PizzaShop").GetComponent<OrderSystem>();
        orderSystem.SetCallback(NewOrderCallback);
    }
Callbacks
The game manager has two callbacks. One is called when an order is generated, and one is called when the order is delivered.
NewOrderCallback is called by the order system when an order is generated. Right now, this is just a placeholder. We log a message. Eventually, we will connect this to the UI. When an order is created, we want to add it to the list of orders.
The DeliveryCallback is called when the order is delivered. We tell the order management system that the delivery is complete, removing it from the list of current orders.
    void NewOrderCallback(Order newOrder)
    {
        // Function to give to OrderSystem Callback
        // Called when a new order is generated
        Debug.Log("Received new order: " + newOrder.customerName);
    }

    // Called when the pizza is delivered
    void DeliveryCallback(){
        Debug.Log("Delivered");
        orderSystem.DeliverOrder(currentOrder.orderNumber);
        currentOrder = null;
    }
SetOrder
The SetOrder function sets the current order to a given order number. We are not using this function yet, but eventually, it will allow the player to select a specific order. We get the order information from the order management system, and we create a target object.
    void SetOrder(int orderNumber)
    {
        // Find the order
        currentOrder = orderSystem.GetOrderInfo(orderNumber);

        GameObject targetObject = GameObject.Instantiate(target);
        targetObject.GetComponent<DeliveryTarget>().StartDelivery(currentOrder,DeliveryCallback);
    }
Update
Finally, we have the update function. This just handles if we delivered an order and need to get the next order. We check whether the current order is null. If so, we get the next order. If the next order exists, we create the target object.
    void Update()
    {
        if(currentOrder == null){
            currentOrder = orderSystem.GetNextOrder();

            // Set the start target
            if(currentOrder != null){
                GameObject targetObject = GameObject.Instantiate(target);
                targetObject.GetComponent<DeliveryTarget>().StartDelivery(currentOrder,DeliveryCallback);
            }
        }
    }
Conclusion
In this post, we navigated the intricacies of constructing an order management system. We delved into the structure and walked through each of the key classes: order system, game manager, and delivery. The delivery system is not perfect. It doesn’t always deliver where we want. We will add this to the list of enhancements for the future.
Stay tuned for our next post, where we will dive into the realm of shaders and materials, empowering you to elevate your visual design and storytelling to new heights.